Export Acteon Treatment Plan
When exporting your Acteon treatment plan, this will also include the multi-file DICOM. In addition to the treatment plan and multi-file DICOM, Implant Concierge will also require a diagnostic cast (a digital impression or a stone model). More information can be found at the bottom of the page.
1. In your Acteon software, left click the CBCT tile to highlight it in blue, then right click and select “Export Case”.

2. A pop-up will appear for the save location. Select “Desktop” and click “Select Folder”. This will export the DICOM and the viewer containing the treatment plan.


3. Once the Export is complete, open the folder to confirm the files saved properly. The raw DICOM files can be found under “Bin” > “Storage” > “PatientsName” > “CT”.


The treatment plan can be found in the viewer by double-clicking on “start”. In the Acteon viewer, you will see a section containing actions for the treatment plan.


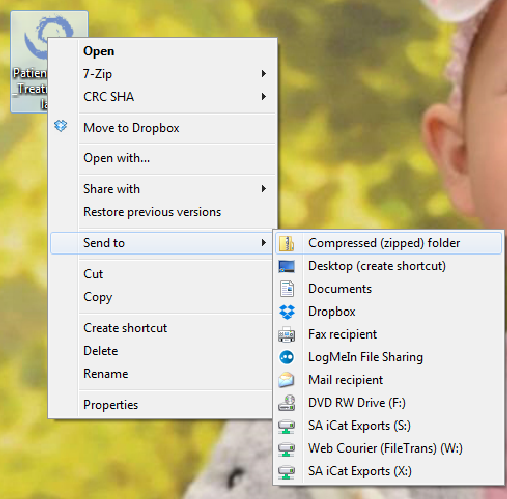
4. On the desktop, right-click on the patient’s folder, go to “Send to”, and select “Compressed (zipped) folder”. A duplicate folder will be made with either a zipper on it, or a blue “Z”.

5. To upload the compressed folder, login to Implant Concierge. Click on the patient’s name to open the case. Click on the red “Upload DICOM” button.


6. Drag and drop the folder from the desktop to Implant Concierge. The file will automatically begin uploading.


7. Once the file reaches 100%, click the green “Complete” button.

For more information regarding sending a diagnostic cast, please use the link below:
Export Blue Sky Bio Treatment Plan
In addition to the Blue Sky Bio treatment plan, Implant Concierge also requires the raw DICOM files, as well as a diagnostic cast (a digital impression or a stone model). More information can be found at the bottom of the page.
1. Once you have completed the treatment plan in your Blue Sky software, click “File” and “Save Project As…”

2. Select the Desktop and change the file name to “PatientName_Treatment_Plan.bsb”. Click “OK”

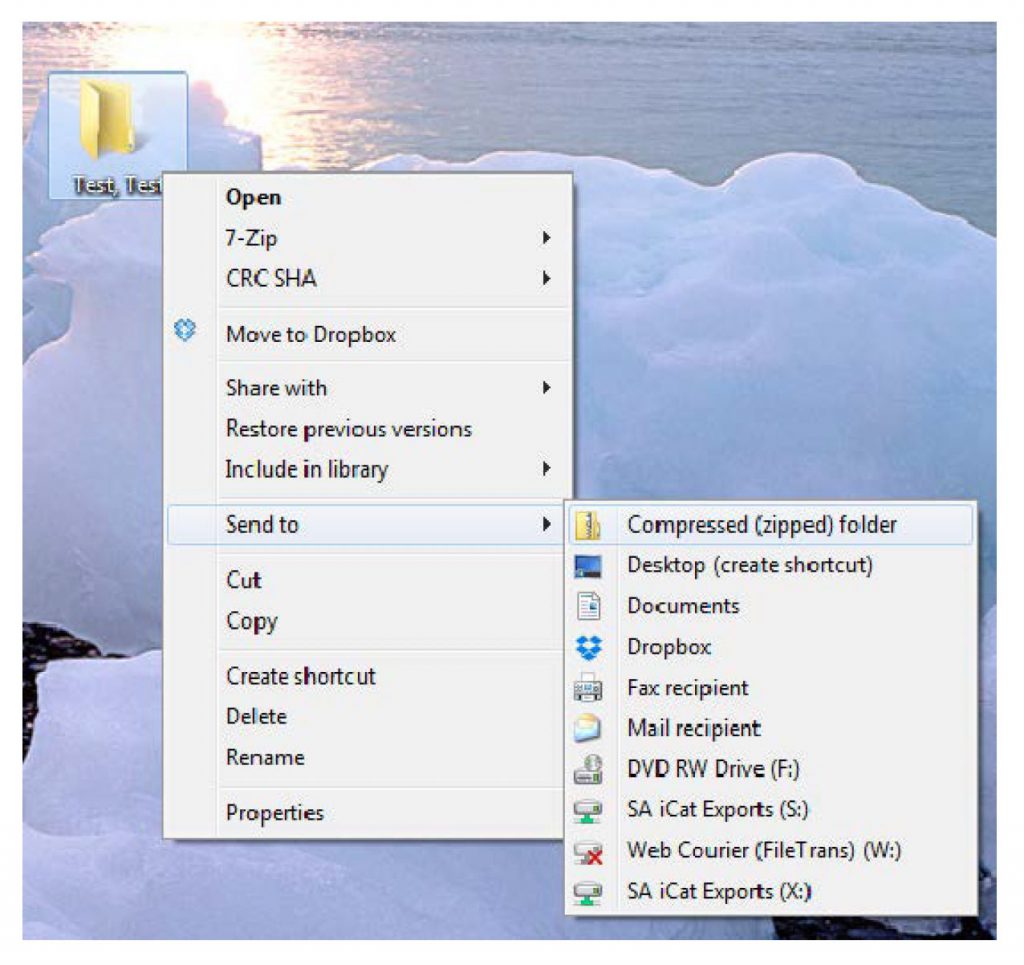
3. After the treatment plan saves, go to the Desktop, right click on the treatment plan, go to “Send to”, and select “Compressed (zipped) folder”. A folder will be made with either a zipper on it, or a blue “Z”.
4. To upload the compressed folder, login to Implant Concierge. Click on the patient’s name to open the case. Click on the red “Upload DICOM” button.
5. Drag and drop the folder from the desktop to Implant Concierge. The file will automatically begin uploading.
6. Once the file reaches 100%, click the green “Complete” button.
For more information regarding Exporting DICOM and sending diagnostic casts, please use the links below:
Export Carestream Treatment Plan
When exporting your Carestream treatment plan, this will also include the multi-file DICOM. In addition to the treatment plan and multi-file DICOM, Implant Concierge will also require a diagnostic cast (a digital impression or a stone model). More information can be found at the bottom of the page.
1. On your desktop, right-click on an empty space. Go to “New” and click “Folder”. A folder will appear with highlighted blue text. Type in the patient name and push “Enter” on your keyboard.

2. In the Carestream software, open the patient history. Select the correct volume and click “Send to”.

3. Choose the option for “Folder Location” and click the “Select” button.

A pop-up will appear. Select the folder you just created on the desktop. Click “OK”.

Under “Other”, please select “3D Viewer” and click “OK”.

4. After the plan exports and saves, go back to the desktop, right-click on the patient’s folder, go to “Send to”, and select “Compressed (zipped) folder”. A duplicate folder will be made with either a zipper on it, or a blue “Z”.
5. To upload the compressed folder, login to Implant Concierge. Click on the patient’s name to open the case. Click on the red “Upload DICOM” button.
6. Drag and drop the folder from the desktop to Implant Concierge. The file will automatically begin uploading.
7. Once the file reaches 100%, click the green “Complete” button.
For more information regarding sending a diagnostic cast, please use the link below:
Export Invivo/Anatomage Treatment Plan
In addition to the Invivo/Anatomage Treatment plan, Implant Concierge also requires the raw DICOM files, as well as a diagnostic cast (a digital impression or a stone model). More information can be found at the bottom of the page.
1. On your desktop, right click on an empty space. Go to “New” and click “Folder”. A folder will appear with highlighted blue text. Type in the patient name and push “Enter” on your keyboard.
2. Once you have completed your treatment plan, go to “File”, and click “Save As”.

3. Select the option “Invivo” and click “OK”.

4. Select the folder you just created on the desktop and click “OK”.

5. A final pop-up will appear. Select “Full” and click “Save”.


6. Go back to the desktop, right click on the patients folder, go to “Send to”, and select “Compressed (zipped) folder”. A duplicate folder will be made with either a zipper on it, or a blue “Z”.
7. To upload the compressed folder, login to Implant Concierge. Click on the patient’s name to open the case. Click on the red “Upload DICOM” button.
8. Drag and drop the folder from the desktop to Implant Concierge. The file will automatically begin uploading.
9. Once the file reaches 100%, click the green “Complete” button.
For more information regarding Exporting DICOM and sending diagnostic casts, please use the links below:
Export Planmeca-Romexis Treatment Plan
When exporting your Planmeca treatment plan, this will also include the multi-file DICOM. In addition to the treatment plan and multi-file DICOM, Implant Concierge will also require a diagnostic cast (a digital impression or a stone model). More information can be found at the bottom of the page.
1. On your desktop, right-click on an empty space. Go to “New” and click “Folder”. A folder will appear with highlighted blue text. Type in the patient name and push “Enter” on your keyboard.
2. Once you have completed your treatment plan, hover over the drop-down menu. In the “Output” section, select “Export Volume”.


3. A pop-up box will appear. Select “Set of Single Frame DICOM Files”. Under “Overlay options” select “Burn Nerves and Implants” and “Include Nerves and Implants”. Under “Viewer options” select “Include Viewer”.

4. Click on the “…” button to choose where to files export to.

5. A second pop up box will appear. Go to the desktop, select the patient’s folder, and click “OK”.


6. The second pop-up box will disappear. Under the file name, type “Patient Last Name, First Name”. Click “OK”. Files will begin to export.


7. After the plan exports and saves, go back to the desktop, right-click on the patient’s folder, go to “Send to”, and select “Compressed (zipped) folder”. A duplicate folder will be made with either a zipper on it, or a blue “Z”.
8. To upload the compressed folder, login to Implant Concierge. Click on the patient’s name to open the case. Click on the red “Upload DICOM” button.
9. Drag and drop the folder from the desktop to Implant Concierge. The file will automatically begin uploading.
10. Once the file reaches 100%, click the green “Complete” button.
For more information regarding sending a diagnostic cast, please use the link below:
Export Sirona-Galaxis Treatment Plan
In addition to the Sirona Treatment plan, Implant Concierge also requires the raw DICOM files, as well as a diagnostic cast (a digital impression or a stone model). More information can be found at the bottom of the page.
1. Open 3d view in Galaxis.
2. Click on “Workspace” then click on “Create Viewer CD”.

3. Select copy to this directory. Then click on “Select Directory”.

4. Click on Desktop, then “Make a New Folder”. Type in the Patient’s Name in the new folder, then click “Ok”.

5. Click on “Copy” to export plan.

6. Once everything is green, click on “OK”.

7. Go to the desktop, right click on the patient’s folder, go to “Send to”, and select “Compressed (zipped) folder”. A duplicate folder will be made with either a zipper on it, or a blue “Z”.
8. To upload the compressed folder, login to Implant Concierge. Click on the patient’s name to open the case. Click on the red “Upload DICOM” button.
9. Drag and drop the folder from the desktop to Implant Concierge. The file will automatically begin uploading.
10. Once the file reaches 100%, click the green “Complete” button.
For more information regarding Exporting DICOM and sending diagnostic casts, please use the links below:
Exporting DICOM from Sidexis XG
Exporting DICOM from Sidexis 4
How To Export a DXD from CEREC
How To Export a DXD from CEREC (4.4 Update)
Export VaTech Treatment Plan (Ez3D-i)
In addition to the VaTech Treatment plan, Implant Concierge also requires the raw DICOM files, as well as a diagnostic cast (a digital impression or a stone model). More information can be found at the bottom of the page.
1. On your desktop, right click on an empty space. Go to “New” and click “Folder”. A folder will appear with highlighted blue text. Type in the patient name and push “Enter” on your keyboard.
2. In your VaTech, open the patient scan. Click on “Main Menu”, then “Export”.

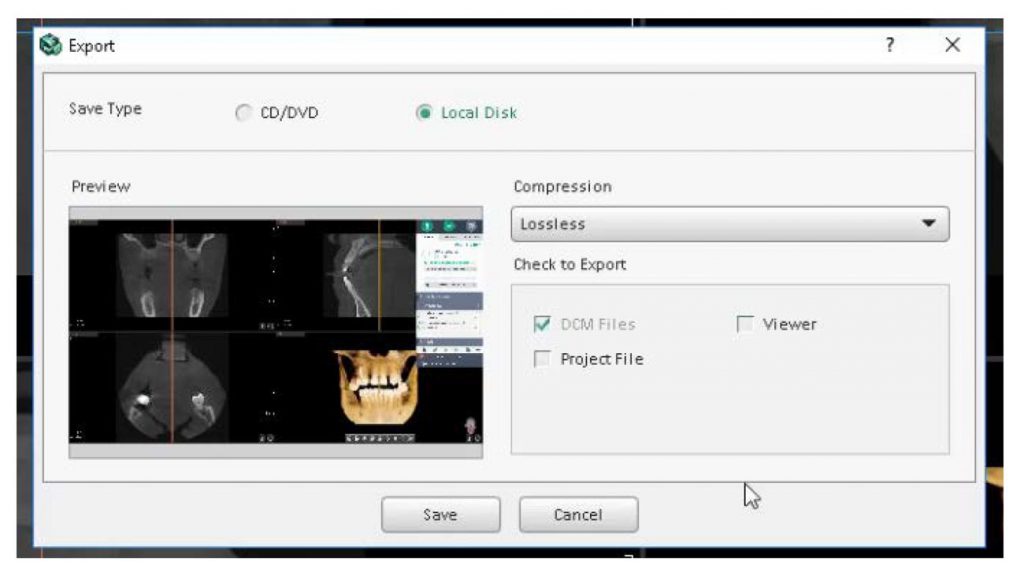
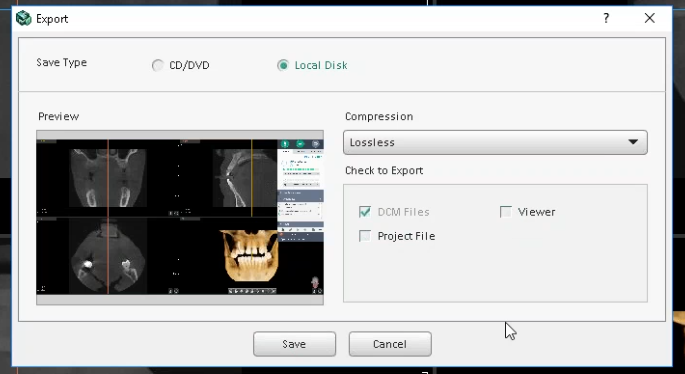
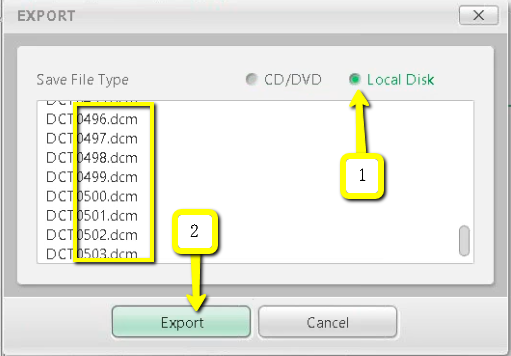
3. A pop up box will appear. For “Save Type”, select “Local Disk”. For Compression, select “Looseless”. Then check the items that you would like to export. Implant Concierge requires only the “DCM Files”. However, if you are a scanning site and would like to send the viewer to the Doctor, select “Viewer”. If you are wanting to export your treatment plan, select “Project File”. Then, click “Save”.
4. A second pop-up will appear for the save location. Select the folder you just created on the desktop, and click “Select Folder”. The DICOM files will begin to export. Once the files are exported, you will get a confirmation pop-up. Click “OK”.


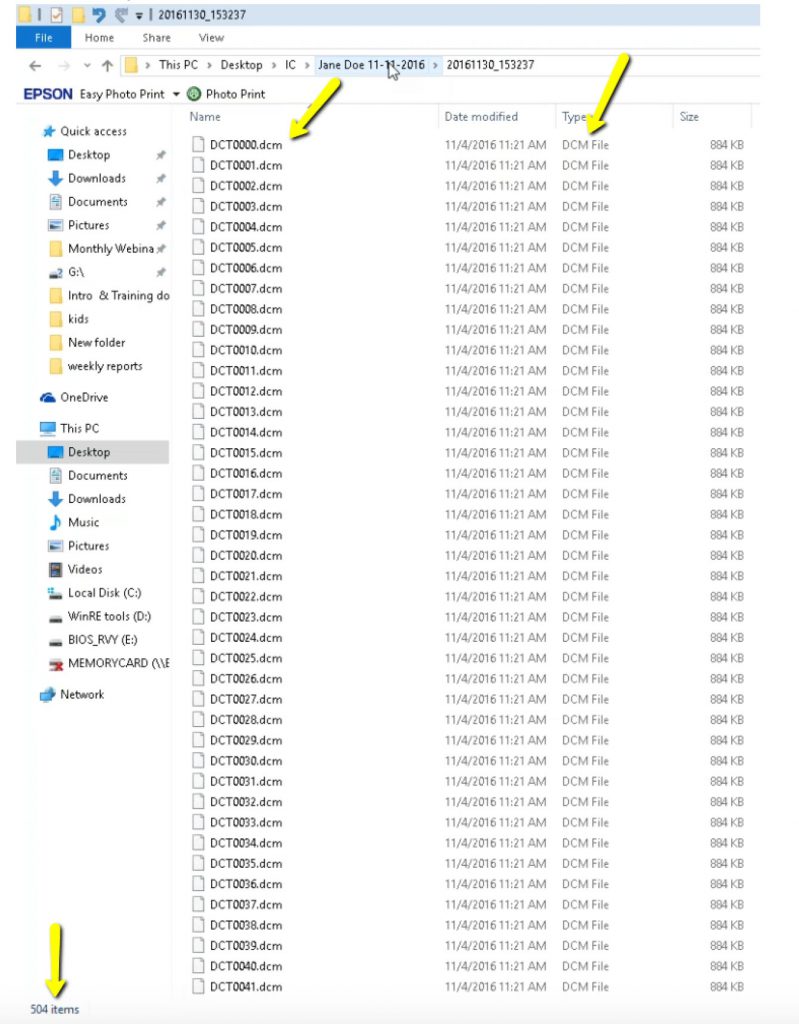
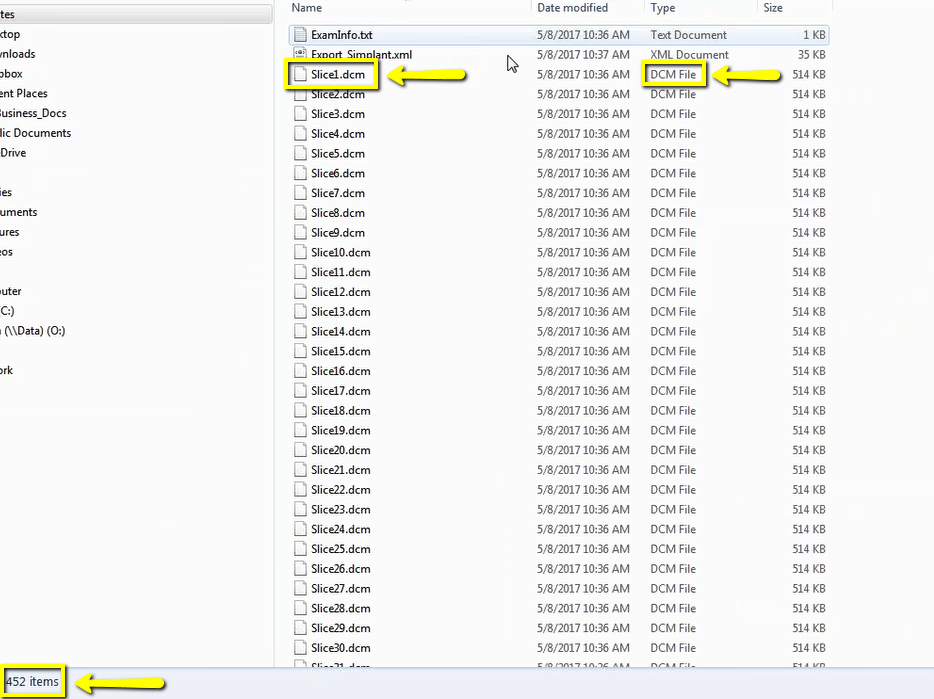
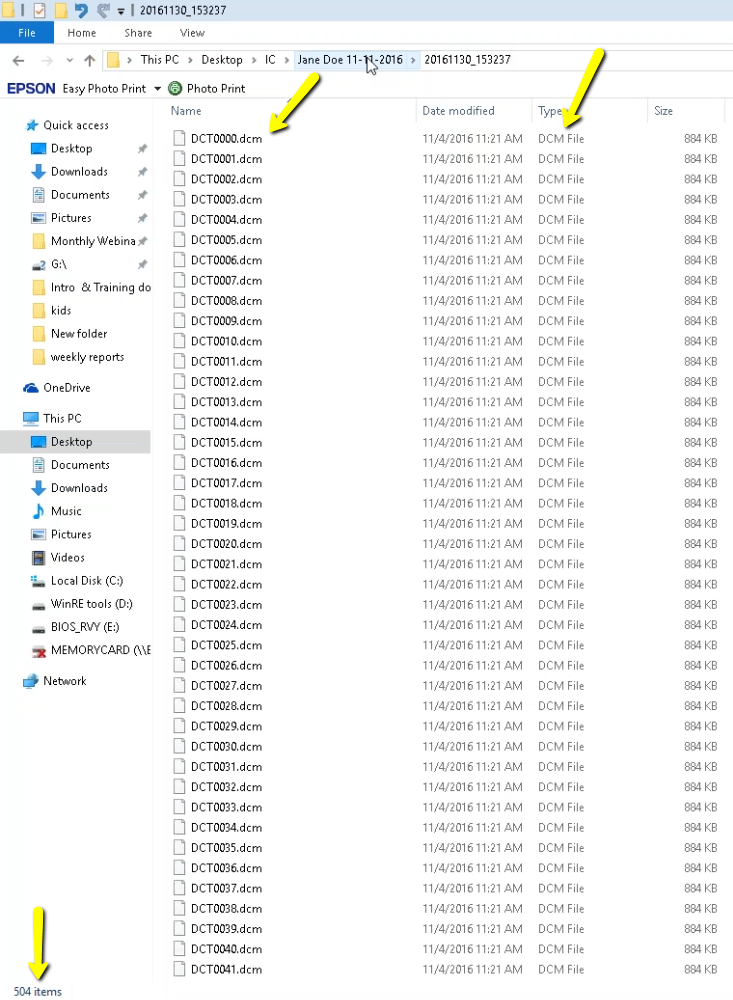
5. After the DICOM exports, go to the patients folder and verify the .dcm files were exported correctly; there should be several hundred files.
6. Go back to the desktop, right click on the patients folder, go to “Send to”, and select “Compressed (zipped) folder”. A duplicate folder will be made with either a zipper on it, or a blue “Z”.
(*** If following a Dual Scan Protocol, please zip scans individually and label accordingly; i.e: “Patient Scan” and “Denture Scan” ***)
7. To upload the compressed folder, login to Implant Concierge. Click on the patient’s name to open the case. Click on the red “Upload DICOM” button.
8. Drag and drop the folder from the desktop to Implant Concierge. The file will automatically begin uploading.
9. Once the file reaches 100%, click the green “Complete” button.
For more information regarding Exporting DICOM and sending diagnostic casts, please use the links below:
Exporting DICOM from VaTech (EZ3D-i)
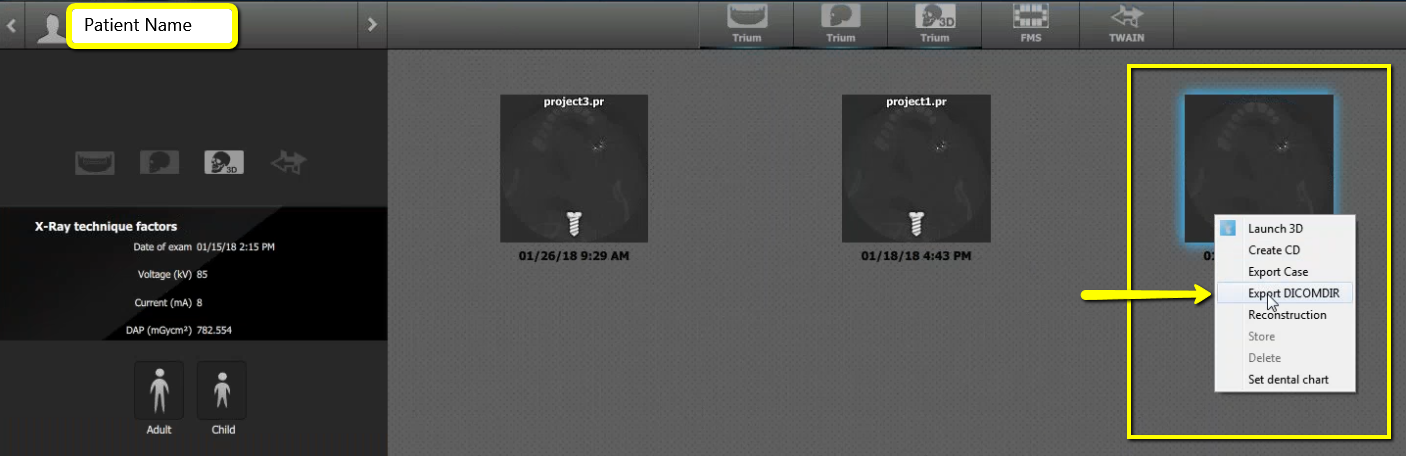
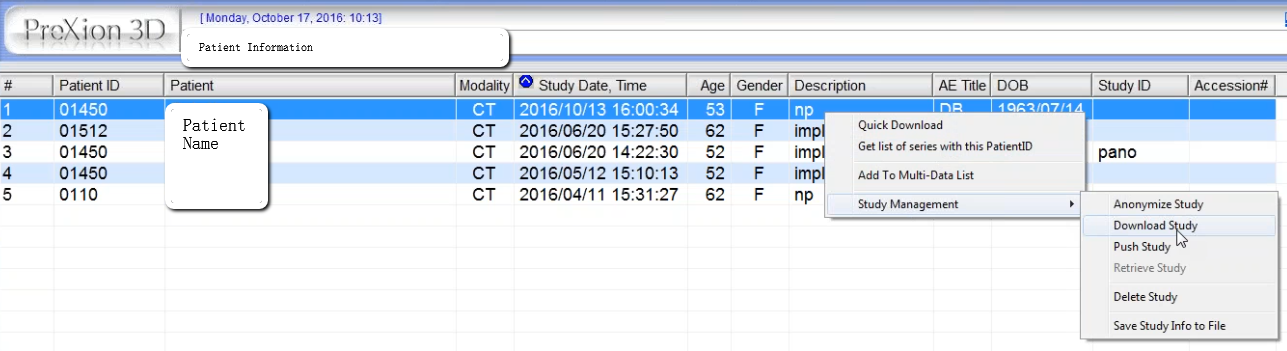
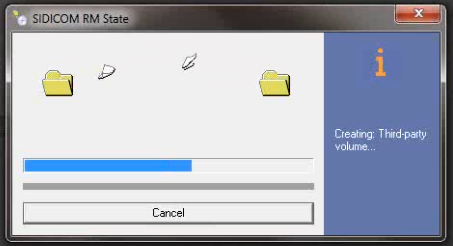
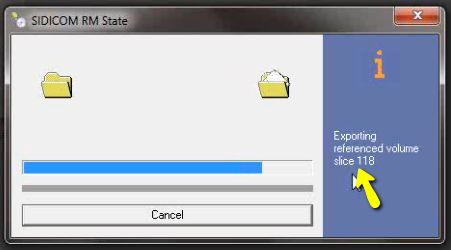
Exporting From Acteon
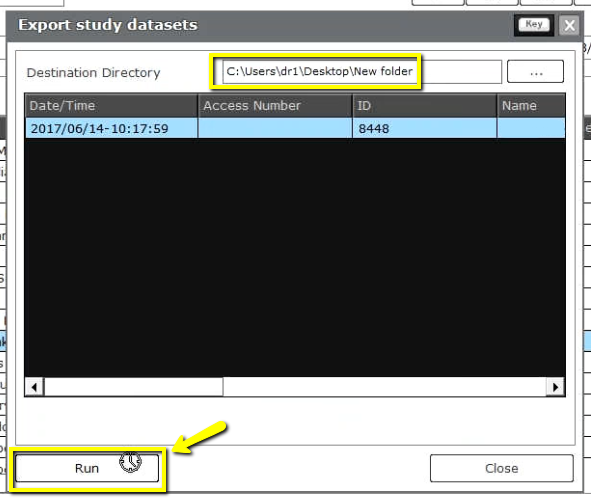
2. Open the patient history and right click on the tile of the newest CBCT. Select “Export DICOMDIR”.
 3. Click the folder you made on the Desktop and click “Select Folder”.
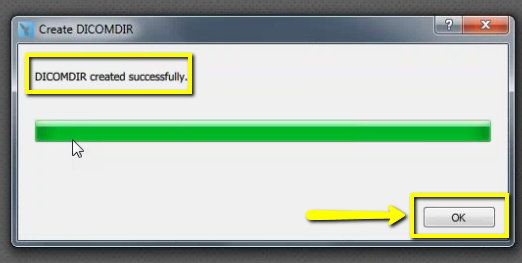
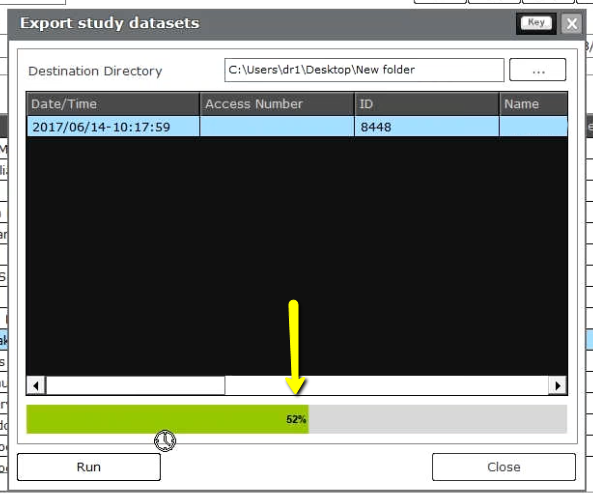
 4. The DICOM will begin exporting. Click “OK” once complete.

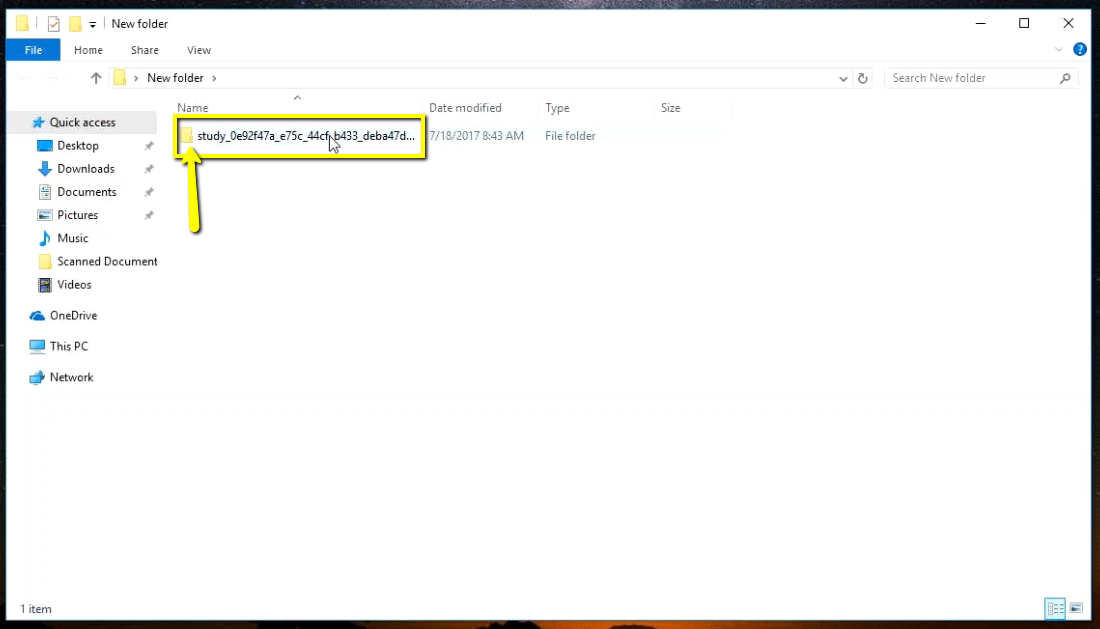
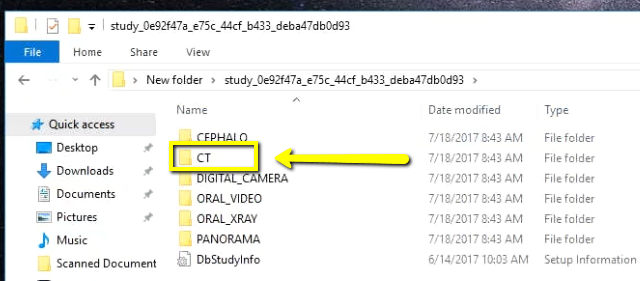
 5. After the DICOM exports and saves, go to the patients folder and verify the .dcm files were exported correctly; there should be several hundred files.
 6. Go back to the desktop, right click on the patients folder, go to “Send to”, and select “Compressed (zipped) folder”. A duplicate folder will be made with either a zipper on it, or a blue “Z”.
(*** If following a Dual Scan Protocol, please zip scans individually and label accordingly; i.e: “Patient Scan” and “Denture Scan” ***)
7. To upload the compressed folder, login to Implant Concierge. Click on the patient’s name to open the case. Click on the red “Upload DICOM” button.
8. Drag and drop the folder from the desktop to Implant Concierge. The file will automatically begin uploading.
9. Once the file reaches 100%, click the green “Complete” button.
6. Go back to the desktop, right click on the patients folder, go to “Send to”, and select “Compressed (zipped) folder”. A duplicate folder will be made with either a zipper on it, or a blue “Z”.
(*** If following a Dual Scan Protocol, please zip scans individually and label accordingly; i.e: “Patient Scan” and “Denture Scan” ***)
7. To upload the compressed folder, login to Implant Concierge. Click on the patient’s name to open the case. Click on the red “Upload DICOM” button.
8. Drag and drop the folder from the desktop to Implant Concierge. The file will automatically begin uploading.
9. Once the file reaches 100%, click the green “Complete” button.
Exporting from Acteon Viewer
 2. Once the CBCT loads in the AIS3DApp, click the folder icon under “DICOM Series”. Click “Zip DICOM series”.
 3. A pop-up will appear for the save location. Select “Desktop”. Type the patients name into the “File Name”. Click “Save”.
 4. In the upper-right-hand corner, you will see a loading box. There will not be an alert when it has finished exporting.
 5. To upload the compressed folder, login to Implant Concierge. Click on the patient’s name to open the case. Click on the red “Upload DICOM” button.
6. Drag and drop the folder from the desktop to Implant Concierge. The file will automatically begin uploading.
7. Once the file reaches 100%, click the green “Complete” button.
5. To upload the compressed folder, login to Implant Concierge. Click on the patient’s name to open the case. Click on the red “Upload DICOM” button.
6. Drag and drop the folder from the desktop to Implant Concierge. The file will automatically begin uploading.
7. Once the file reaches 100%, click the green “Complete” button.
Export from AxiUm MiPacs
1. On your desktop, right click on an empty space. Go to “New” and click “Folder”. A folder will appear with highlighted blue text. Type in the patient name and push “Enter” on your keyboard.
2. Select your patients CBCT scan in the MiPacs software.

3. Go to “Image” and click “Export Images”.

4. A pop-up box will appear. Under “Destination” select the folder you created on your desktop and click “Ok”.

5. Ensure that “Selected image(s)” is checked and that the “File Format” is set to “DICOM”. No other boxes should be checked. Click “OK”.

6. After the DICOM exports and saves, go to the patients folder and verify the .dcm files were exported correctly; there should be several hundred files.
7. Go back to the desktop, right click on the patients folder, go to “Send to”, and select “Compressed (zipped) folder”. A duplicate folder will be made with either a zipper on it, or a blue “Z”.
(*** If following a Dual Scan Protocol, please zip scans individually and label accordingly; i.e: “Patient Scan” and “Denture Scan” ***)
8. To upload the compressed folder, login to Implant Concierge. Click on the patient’s name to open the case. Click on the red “Upload DICOM” button.
9. Drag and drop the folder from the desktop to Implant Concierge. The file will automatically begin uploading.
10. Once the file reaches 100%, click the green “Complete” button.
Exporting from Carestream
2. Open your image and go to the “Export the volume” icon located on the left side of your screen.
 3. In the pop up window, you’ll notice 3 different sections. On the first section, click “Browse” to select the export location.
 4. Another pop-up will appear. Select the folder you just created on the desktop. Click “OK”.
5. The second pop-up will disappear. Section 2 options should never have to be changed. Under section 3, select “CT (one file per slice)” and “Uncompressed” . Please unsure that “Create DICOMDir” remains UNCHECKED. Click “Export”.
4. Another pop-up will appear. Select the folder you just created on the desktop. Click “OK”.
5. The second pop-up will disappear. Section 2 options should never have to be changed. Under section 3, select “CT (one file per slice)” and “Uncompressed” . Please unsure that “Create DICOMDir” remains UNCHECKED. Click “Export”.
 6. After the DICOM exports and saves, go to the patients folder and verify the .dcm files were exported correctly; there should be several hundred files.
7. Go back to the desktop, right click on the patients folder, go to “Send to”, and select “Compressed (zipped) folder”. A duplicate folder will be made with either a zipper on it, or a blue “Z”.
(*** If following a Dual Scan Protocol, please zip scans individually and label accordingly; i.e: “Patient Scan” and “Denture Scan” ***)
8. To upload the compressed folder, login to Implant Concierge. Click on the patient’s name to open the case. Click on the red “Upload DICOM” button.
9. Drag and drop the folder from the desktop to Implant Concierge. The file will automatically begin uploading.
10. Once the file reaches 100%, click the green “Complete” button.
6. After the DICOM exports and saves, go to the patients folder and verify the .dcm files were exported correctly; there should be several hundred files.
7. Go back to the desktop, right click on the patients folder, go to “Send to”, and select “Compressed (zipped) folder”. A duplicate folder will be made with either a zipper on it, or a blue “Z”.
(*** If following a Dual Scan Protocol, please zip scans individually and label accordingly; i.e: “Patient Scan” and “Denture Scan” ***)
8. To upload the compressed folder, login to Implant Concierge. Click on the patient’s name to open the case. Click on the red “Upload DICOM” button.
9. Drag and drop the folder from the desktop to Implant Concierge. The file will automatically begin uploading.
10. Once the file reaches 100%, click the green “Complete” button.
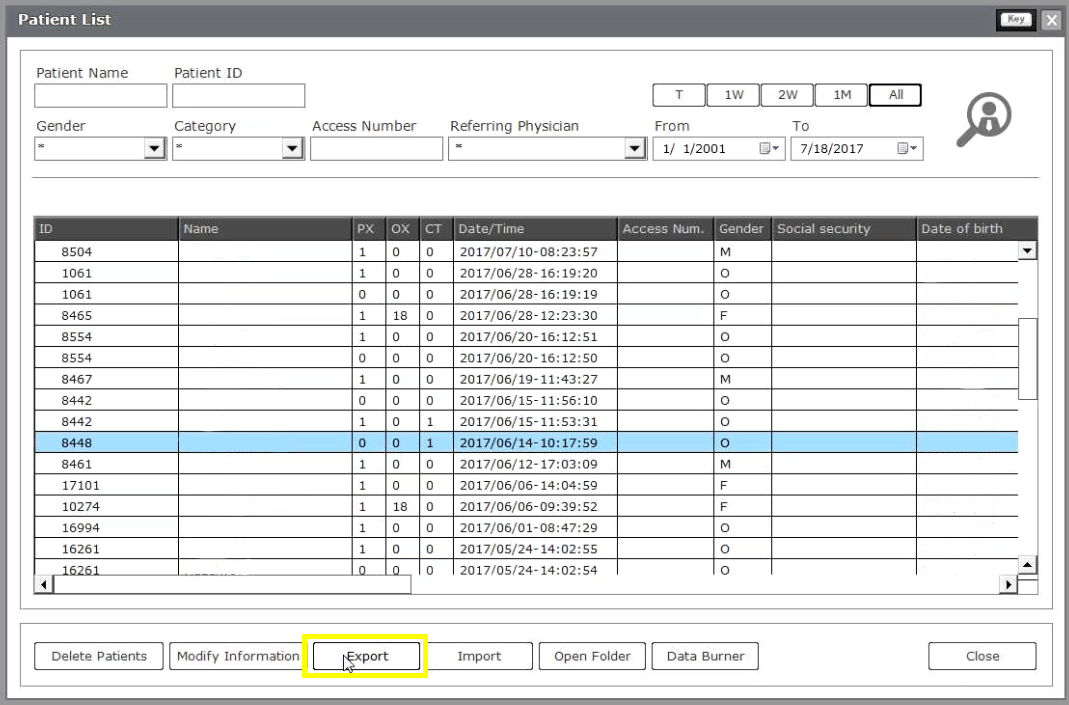
Export from DatCard Systems
2. Open the patients CBCT scan and click on “Export” and “Study Export”.
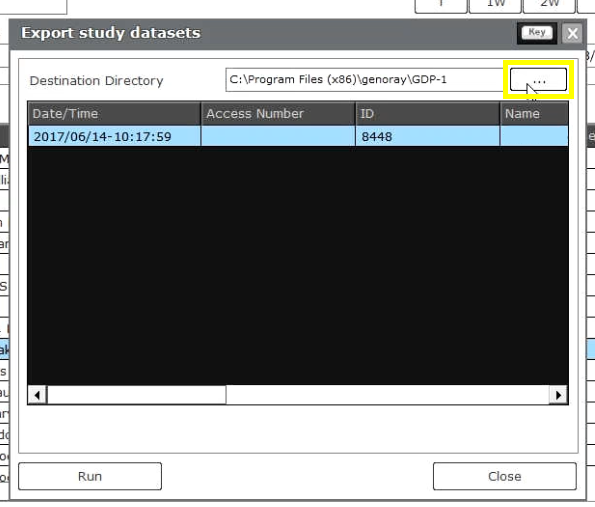
 3. A pop up will appear. Under “Export Path”, click “Browse Folders” and select the folder you just created on the desktop and click “OK”.
 4. Select both “Use DCM file suffix” and “Save Uncompressed”. Click Export.
 5. After the DICOM exports and saves, go to the patients folder and verify the .dcm files were exported correctly; there should be several hundred files.
6. Go back to the desktop, right click on the patients folder, go to “Send to”, and select “Compressed (zipped) folder”. A duplicate folder will be made with either a zipper on it, or a blue “Z”.
(*** If following a Dual Scan Protocol, please zip scans individually and label accordingly; i.e: “Patient Scan” and “Denture Scan” ***)
7. To upload the compressed folder, login to Implant Concierge. Click on the patient’s name to open the case. Click on the red “Upload DICOM” button.
8. Drag and drop the folder from the desktop to Implant Concierge. The file will automatically begin uploading.
9. Once the file reaches 100%, click the green “Complete” button.
5. After the DICOM exports and saves, go to the patients folder and verify the .dcm files were exported correctly; there should be several hundred files.
6. Go back to the desktop, right click on the patients folder, go to “Send to”, and select “Compressed (zipped) folder”. A duplicate folder will be made with either a zipper on it, or a blue “Z”.
(*** If following a Dual Scan Protocol, please zip scans individually and label accordingly; i.e: “Patient Scan” and “Denture Scan” ***)
7. To upload the compressed folder, login to Implant Concierge. Click on the patient’s name to open the case. Click on the red “Upload DICOM” button.
8. Drag and drop the folder from the desktop to Implant Concierge. The file will automatically begin uploading.
9. Once the file reaches 100%, click the green “Complete” button.
Exporting from ICAT
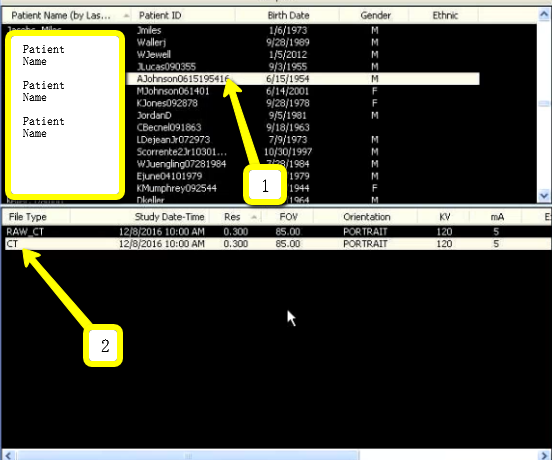
2. In the patient database, click on the patient name. Under the “File Type”, click on “CT”.
 3. A pop-up will appear. Click on the file, and click “Create New Workup”.
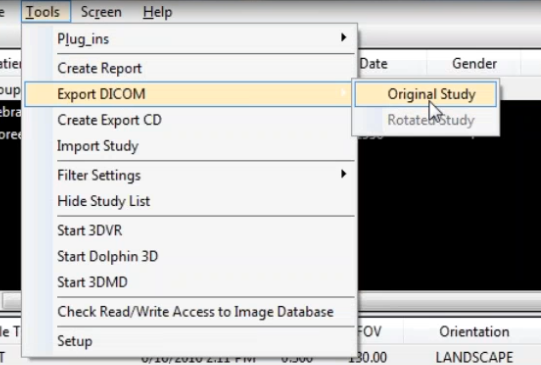
 4. The patient scans will load. In the upper left corner, click on “Tools”, “Export DICOM”, then “Original Study”.
 5. Make sure “Multi-File DICOM” and “Uncompressed” are selected. Then click on “Browse” to choose the export location.
 6. Select the folder you just created on the desktop and click “OK”.
7. You will return to this screen. Click “OK”. Your files will begin exporting.
6. Select the folder you just created on the desktop and click “OK”.
7. You will return to this screen. Click “OK”. Your files will begin exporting.
 8. Click on “OK” when the “Done” pop up appears.
 9. After the DICOM exports and saves, go to the patients folder and verify the .dcm files were exported correctly; there should be several hundred files.
10. Go back to the desktop, right click on the patients folder, go to “Send to”, and select “Compressed (zipped) folder”. A duplicate folder will be made with either a zipper on it, or a blue “Z”.
(*** If following a Dual Scan Protocol, please zip scans individually and label accordingly; i.e: “Patient Scan” and “Denture Scan” ***)
11. To upload the compressed folder, login to Implant Concierge. Click on the patient’s name to open the case. Click on the red “Upload DICOM” button.
12. Drag and drop the folder from the desktop to Implant Concierge. The file will automatically begin uploading.
13. Once the file reaches 100%, click the green “Complete” button.
9. After the DICOM exports and saves, go to the patients folder and verify the .dcm files were exported correctly; there should be several hundred files.
10. Go back to the desktop, right click on the patients folder, go to “Send to”, and select “Compressed (zipped) folder”. A duplicate folder will be made with either a zipper on it, or a blue “Z”.
(*** If following a Dual Scan Protocol, please zip scans individually and label accordingly; i.e: “Patient Scan” and “Denture Scan” ***)
11. To upload the compressed folder, login to Implant Concierge. Click on the patient’s name to open the case. Click on the red “Upload DICOM” button.
12. Drag and drop the folder from the desktop to Implant Concierge. The file will automatically begin uploading.
13. Once the file reaches 100%, click the green “Complete” button.
Exporting from ICAT Classic
2. In the patient database, click on the patient name, and select the most recent CBCT. Click “Export”.
 3. A pop-up will appear with the save location. Under “Export Type” ensure it reads “DICOM 3 (Multi-file)”.
 4. Select the folder you just created on the desktop. Click “Open” and “Export”.

 5. After the DICOM exports and saves, go to the patients folder and verify the .dcm files were exported correctly; there should be several hundred files.
6. Go back to the desktop, right click on the patients folder, go to “Send to”, and select “Compressed (zipped) folder”. A duplicate folder will be made with either a zipper on it, or a blue “Z”.
(*** If following a Dual Scan Protocol, please zip scans individually and label accordingly; i.e: “Patient Scan” and “Denture Scan” ***)
7. To upload the compressed folder, login to Implant Concierge. Click on the patient’s name to open the case. Click on the red “Upload DICOM” button.
8. Drag and drop the folder from the desktop to Implant Concierge. The file will automatically begin uploading.
9. Once the file reaches 100%, click the green “Complete” button.
5. After the DICOM exports and saves, go to the patients folder and verify the .dcm files were exported correctly; there should be several hundred files.
6. Go back to the desktop, right click on the patients folder, go to “Send to”, and select “Compressed (zipped) folder”. A duplicate folder will be made with either a zipper on it, or a blue “Z”.
(*** If following a Dual Scan Protocol, please zip scans individually and label accordingly; i.e: “Patient Scan” and “Denture Scan” ***)
7. To upload the compressed folder, login to Implant Concierge. Click on the patient’s name to open the case. Click on the red “Upload DICOM” button.
8. Drag and drop the folder from the desktop to Implant Concierge. The file will automatically begin uploading.
9. Once the file reaches 100%, click the green “Complete” button.
Exporting from Iluma
1. On your desktop, right click on an empty space. Go to “New” and click “Folder”. A folder will appear with highlighted blue text. Type in the patient name and push “Enter” on your keyboard.
2. Find the patient in the database and open their CBCT scan.

3. Once the scan opens, under “Exporter”, select the option “Send to folder as DICOM (prompt for destination)”. Click the green arrow, titled “Start Export”.


4. A pop-up will appear for the save location. Select the folder that you just created on the desktop and click “OK”.
5. A summary will appear for exporting data. Click “Continue”.


6. Once complete, click “OK”.

7. After the DICOM exports and saves, go to the patients folder and verify the individual files were exported correctly; there should be several hundred files.

8. Go back to the desktop, right click on the patients folder, go to “Send to”, and select “Compressed (zipped) folder”. A duplicate folder will be made with either a zipper on it, or a blue “Z”.
(*** If following a Dual Scan Protocol, please zip scans individually and label accordingly; i.e: “Patient Scan” and “Denture Scan” ***)
9. To upload the compressed folder, login to Implant Concierge. Click on the patient’s name to open the case. Click on the red “Upload DICOM” button.
10. Drag and drop the folder from the desktop to Implant Concierge. The file will automatically begin uploading.
Exporting from Instrumetarium
2. In your Instrumetarium, click on “File”, then “Open Image”.
 3. Select the CBCT scan by clicking on it once. Then click “Export”.
 4. A pop up will appear. Ensure DICOM Modality is set to “CT”. Select the folder you just created on the desktop and click “Export”.
 5. After the DICOM exports and saves, go to the patients folder and verify the .dcm files were exported correctly; there should be several hundred files.
6. Go back to the desktop, right click on the patients folder, go to “Send to”, and select “Compressed (zipped) folder”. A duplicate folder will be made with either a zipper on it, or a blue “Z”.
(*** If following a Dual Scan Protocol, please zip scans individually and label accordingly; i.e: “Patient Scan” and “Denture Scan” ***)
7. To upload the compressed folder, login to Implant Concierge. Click on the patient’s name to open the case. Click on the red “Upload DICOM” button.
8. Drag and drop the folder from the desktop to Implant Concierge. The file will automatically begin uploading.
9. Once the file reaches 100%, click the green “Complete” button.
5. After the DICOM exports and saves, go to the patients folder and verify the .dcm files were exported correctly; there should be several hundred files.
6. Go back to the desktop, right click on the patients folder, go to “Send to”, and select “Compressed (zipped) folder”. A duplicate folder will be made with either a zipper on it, or a blue “Z”.
(*** If following a Dual Scan Protocol, please zip scans individually and label accordingly; i.e: “Patient Scan” and “Denture Scan” ***)
7. To upload the compressed folder, login to Implant Concierge. Click on the patient’s name to open the case. Click on the red “Upload DICOM” button.
8. Drag and drop the folder from the desktop to Implant Concierge. The file will automatically begin uploading.
9. Once the file reaches 100%, click the green “Complete” button.
Exporting from Kavo – Invivo
2. Open your image and click on “File”, “Save As”, “Multi File DICOM with .dcm”, and click “OK”.

 3. Select the folder you just created on the desktop and click “OK”.
4. Please ensure that “Uncompressed” is selected and click “OK”.
3. Select the folder you just created on the desktop and click “OK”.
4. Please ensure that “Uncompressed” is selected and click “OK”.
 5. Your files will begin exporting. Click “OK” when the files save.

 7. After the DICOM exports and saves, go to the patients folder and verify the .dcm files were exported correctly; there should be several hundred files.
8. Go back to the desktop, right click on the patients folder, go to “Send to”, and select “Compressed (zipped) folder”. A duplicate folder will be made with either a zipper on it, or a blue “Z”.
(*** If following a Dual Scan Protocol, please zip scans individually and label accordingly; i.e: “Patient Scan” and “Denture Scan” ***)
9. To upload the compressed folder, login to Implant Concierge. Click on the patient’s name to open the case. Click on the red “Upload DICOM” button.
10. Drag and drop the folder from the desktop to Implant Concierge. The file will automatically begin uploading.
11. Once the file reaches 100%, click the green “Complete” button.
7. After the DICOM exports and saves, go to the patients folder and verify the .dcm files were exported correctly; there should be several hundred files.
8. Go back to the desktop, right click on the patients folder, go to “Send to”, and select “Compressed (zipped) folder”. A duplicate folder will be made with either a zipper on it, or a blue “Z”.
(*** If following a Dual Scan Protocol, please zip scans individually and label accordingly; i.e: “Patient Scan” and “Denture Scan” ***)
9. To upload the compressed folder, login to Implant Concierge. Click on the patient’s name to open the case. Click on the red “Upload DICOM” button.
10. Drag and drop the folder from the desktop to Implant Concierge. The file will automatically begin uploading.
11. Once the file reaches 100%, click the green “Complete” button.
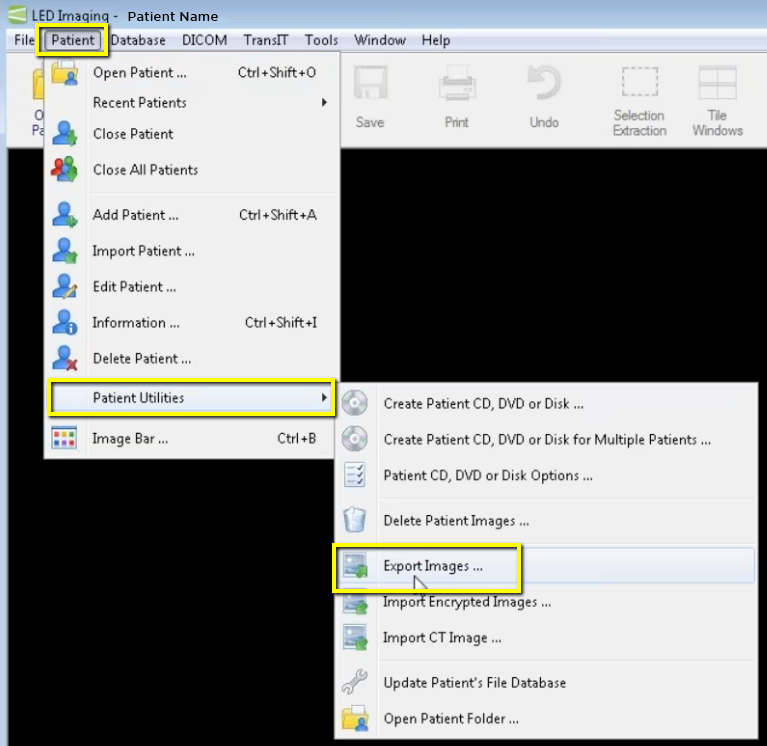
Exporting from LED Imaging
2. Select the patient in your database and go to “Patient”, “Patient Utilities”, and click “Export Images”.
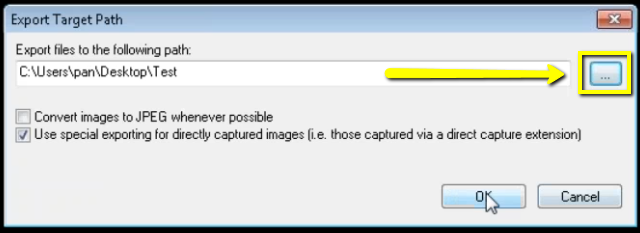
 3. A pop-up will appear. Click the “…” button and select the folder you made on the Desktop.
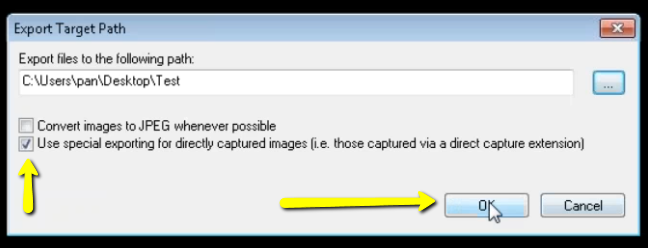
 4. Ensure “Convert to JPEG whenever possible” is UNchecked, and “Use Special exporting for directly captured images” IS checked. Click “OK”.
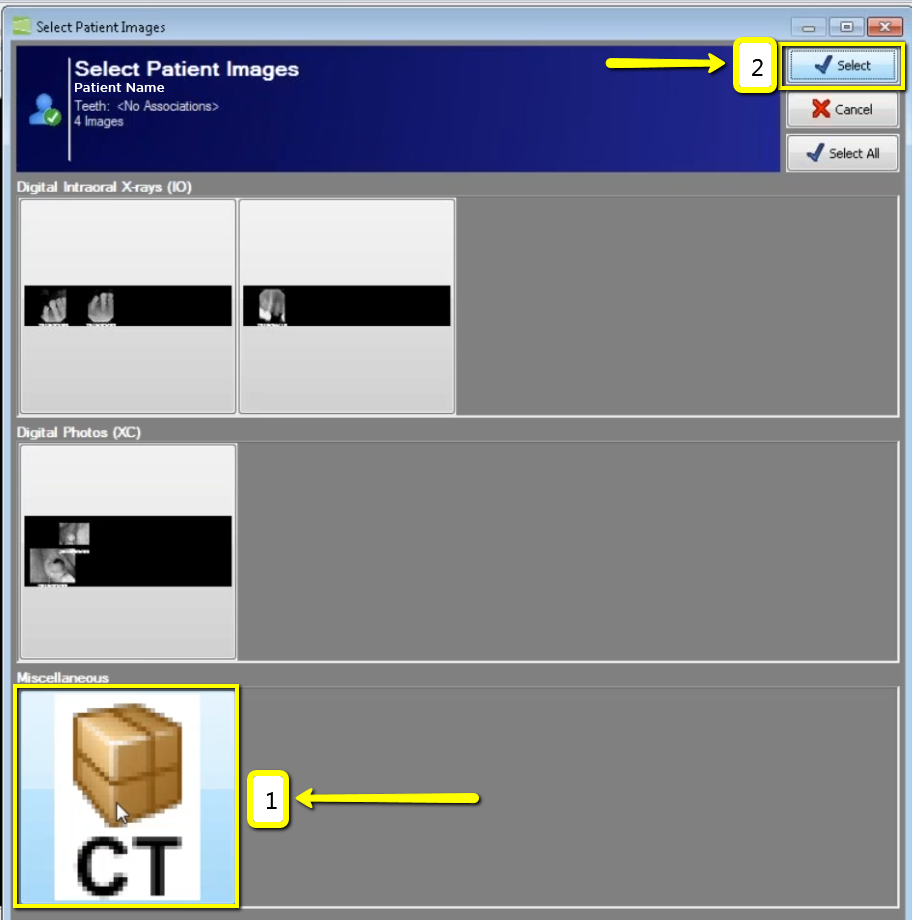
 5. Another pop-up will appear. Click the CT scan and click “Select”.
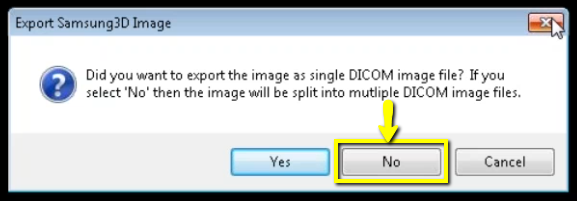
 6. A final pop-up will appear. Click “No” to export the multi-file DICOM.
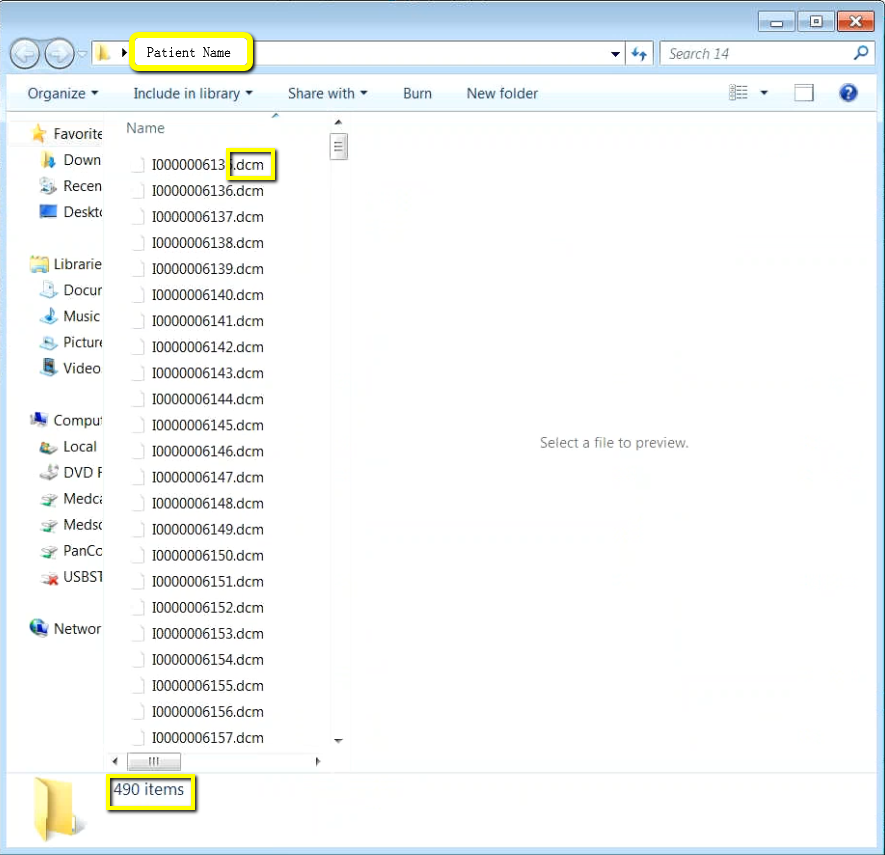
 7. Go to the patient’s folder on the desktop and double-click to open it. Verify the .dcm files were exported correctly; there should be several hundred files.
 8. Go back to the desktop, right click on the patients folder, go to “Send to”, and select “Compressed (zipped) folder”. A duplicate folder will be made with either a zipper on it, or a blue “Z”.
(*** If following a Dual Scan Protocol, please zip scans individually and label accordingly; i.e: “Patient Scan” and “Denture Scan” ***)
9. To upload the compressed folder, login to Implant Concierge. Click on the patient’s name to open the case. Click on the red “Upload DICOM” button.
10. Drag and drop the folder from the desktop to Implant Concierge. The file will automatically begin uploading.
11. Once the file reaches 100%, click the green “Complete” button.
8. Go back to the desktop, right click on the patients folder, go to “Send to”, and select “Compressed (zipped) folder”. A duplicate folder will be made with either a zipper on it, or a blue “Z”.
(*** If following a Dual Scan Protocol, please zip scans individually and label accordingly; i.e: “Patient Scan” and “Denture Scan” ***)
9. To upload the compressed folder, login to Implant Concierge. Click on the patient’s name to open the case. Click on the red “Upload DICOM” button.
10. Drag and drop the folder from the desktop to Implant Concierge. The file will automatically begin uploading.
11. Once the file reaches 100%, click the green “Complete” button.
Exporting from Morita
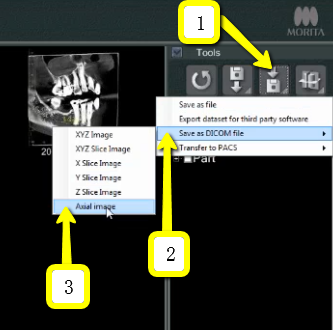
 3. On the right side of the screen, click on “Save DICOM” button. Choose “Save as DICOM File”, then click “Axial Image”.
 4. A box will pop-up titled “Slice Setting”. Change the “Interval” and “Thickness” to the lowest setting possible (about 0.160 for each setting). Then click “OK”.
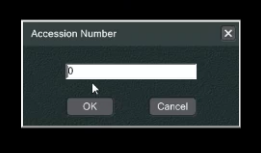
 5. Accession Number should be 0. Click “OK”.
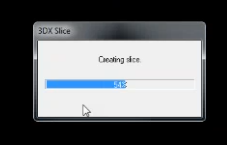
 6. Your DICOM Files are now exporting.
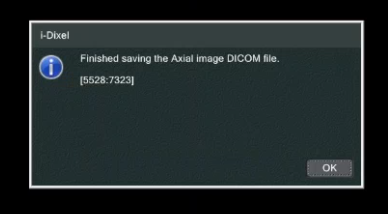
 7. When complete, you will be prompted with a new alert window that says “Finished saving the Axial Image DICOM File”. Click “OK”
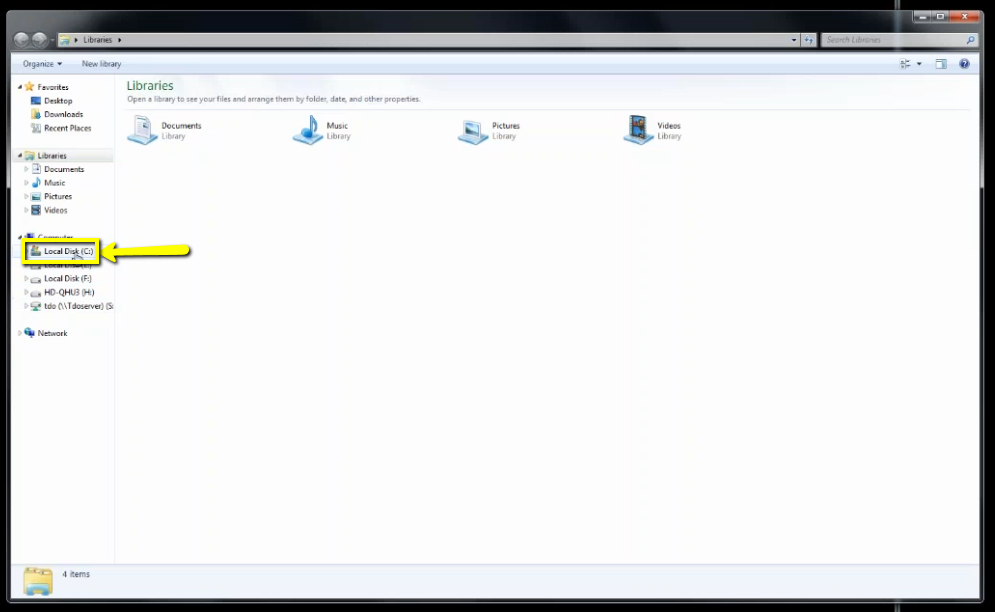
 8. Locate these DICOM files by clicking on “Local Disk (C:)”, then “JMoritaMFG”, “3Dx”, “Simulation”.
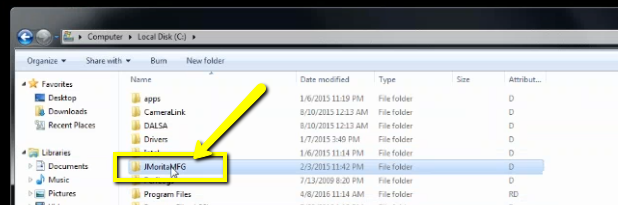

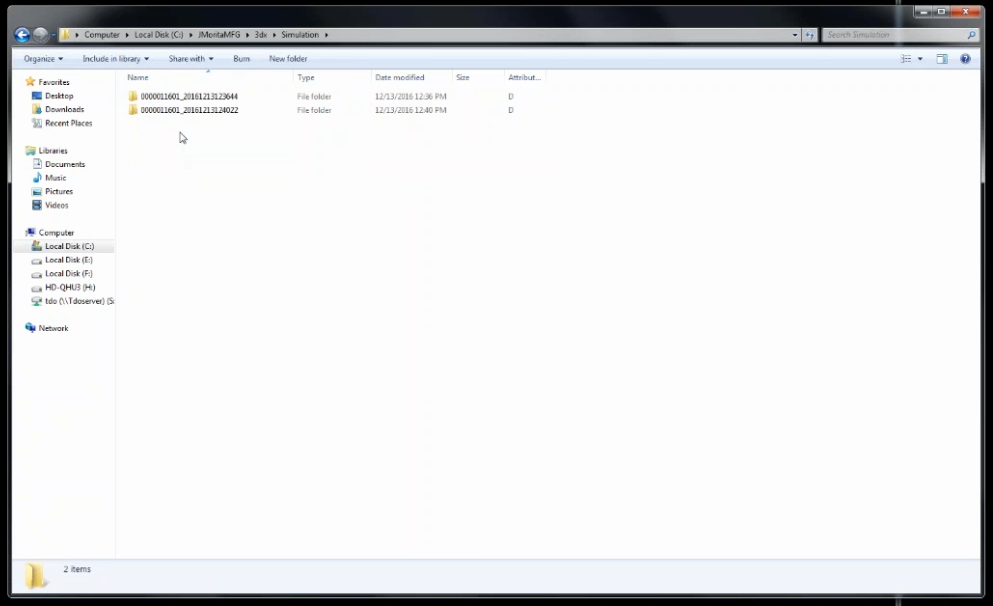
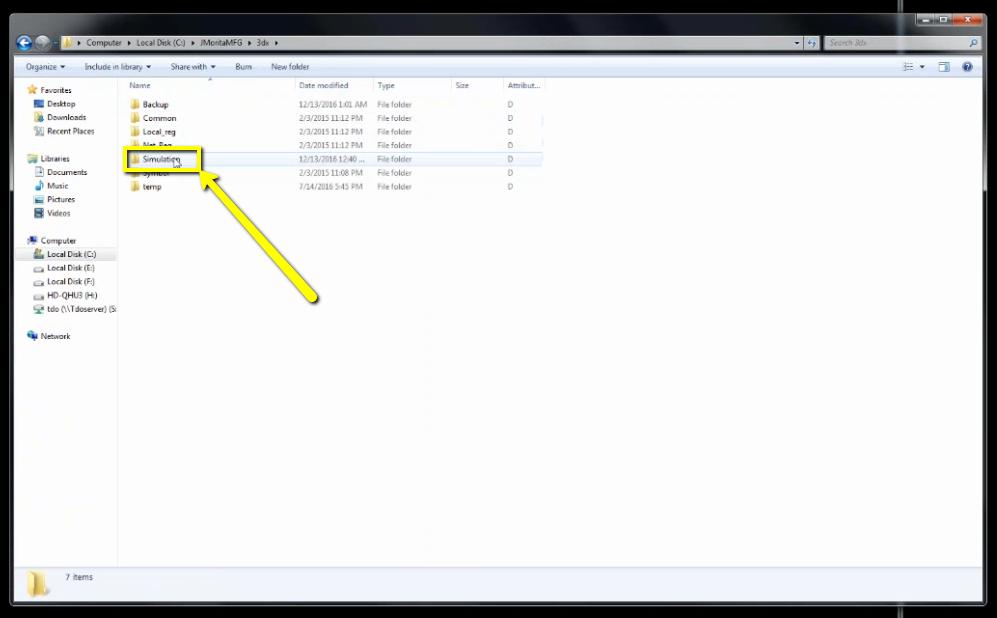 9. Files will be labeled with patient number first, followed by date of scan.
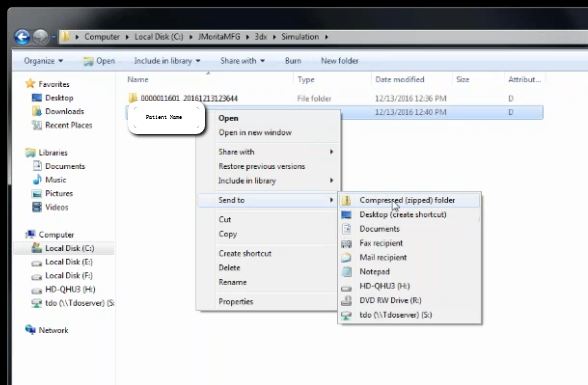
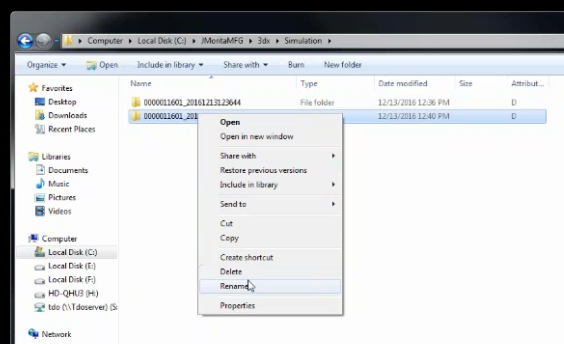 11. Right click on the patients folder, go to “Send to”, and select “Compressed (zipped) folder”. A duplicate folder will be made with either a zipper on it, or a blue “Z”. (*** If following a Dual Scan Protocol, please zip scans individually and label accordingly; i.e: “Patient Scan” and “Denture Scan” ***)
 12. To upload the compressed folder, login to Implant Concierge. Click on the patient’s name to open the case. Click on the red “Upload DICOM” button.
13. Drag and drop the folder from the desktop to Implant Concierge. The file will automatically begin uploading.
14. Once the file reaches 100%, click the green “Complete” button.
12. To upload the compressed folder, login to Implant Concierge. Click on the patient’s name to open the case. Click on the red “Upload DICOM” button.
13. Drag and drop the folder from the desktop to Implant Concierge. The file will automatically begin uploading.
14. Once the file reaches 100%, click the green “Complete” button.
Exporting from NewTom
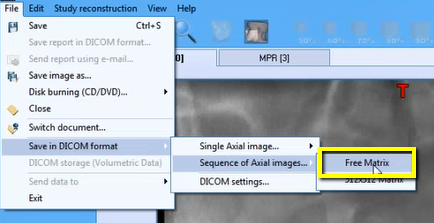
2. Open the patients scan. Select “File”, “Save in DICOM format”, “Sequence of Axial Images”, and select “Free Matrix”.
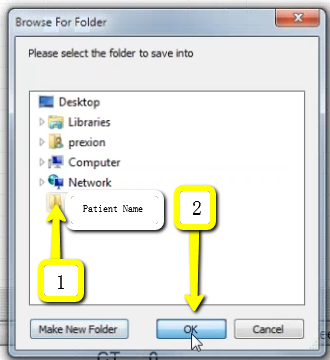
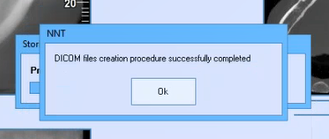
 3. A pop-up will appear for the export location. Select the folder you just created on your desktop. Click “OK” to export images. Another pop-up will appear once DICOM has exported. Click “Ok”.
 4. Go to the patients folder on the desktop and double click to open it. Verify the .dcm files were exported correctly; there should be several hundred files.
5. Go to the desktop, right click on the patients folder, go to “Send to”, and select “Compressed (zipped) folder”. A duplicate folder will be made with either a zipper on it, or a blue “Z”. (*** If following a Dual Scan Protocol, please zip scans individually and label accordingly; i.e: “Patient Scan” and “Denture Scan” ***)
6. To upload the compressed folder, login to Implant Concierge. Click on the patient’s name to open the case. Click on the red “Upload DICOM” button.
7. Drag and drop the folder from the desktop to Implant Concierge. The file will automatically begin uploading.
8. Once the file reaches 100%, click the green “Complete” button.
4. Go to the patients folder on the desktop and double click to open it. Verify the .dcm files were exported correctly; there should be several hundred files.
5. Go to the desktop, right click on the patients folder, go to “Send to”, and select “Compressed (zipped) folder”. A duplicate folder will be made with either a zipper on it, or a blue “Z”. (*** If following a Dual Scan Protocol, please zip scans individually and label accordingly; i.e: “Patient Scan” and “Denture Scan” ***)
6. To upload the compressed folder, login to Implant Concierge. Click on the patient’s name to open the case. Click on the red “Upload DICOM” button.
7. Drag and drop the folder from the desktop to Implant Concierge. The file will automatically begin uploading.
8. Once the file reaches 100%, click the green “Complete” button.
Exporting from NewTom Viewer
1. On your desktop, right-click on an empty space. Go to “New” and click “Folder”. A folder will appear with highlighted blue text. Type in the patient name and push “Enter” on your keyboard.
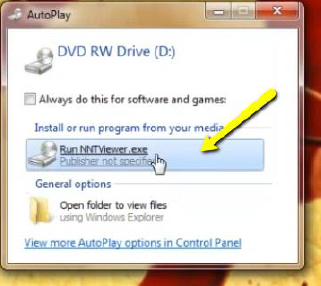
2. Place CD in the computer tower. Wait for pop-up to appear, and click on “RunNNTViewer”.
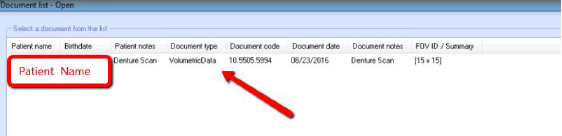
3. A document list will open. Double click on the patients’ name to launch the viewer.
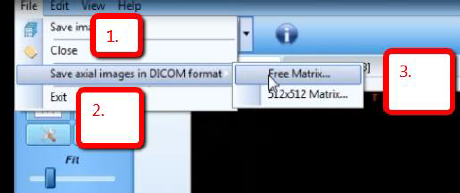
4. Once CBCT scan opens, click on “File”, then “Save Axial Images in DICOM format”, then “Free Matrix”.
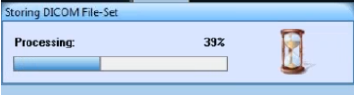
5. A pop-up will appear for the export location. Select the folder you just created on your desktop. Click “OK” to export images.
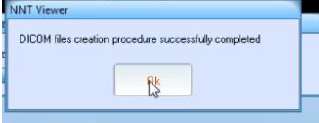
6. After the DICOM exports and saves, go to the patients folder and verify the .dcm files were exported correctly; there should be several hundred files.
7. Go back to the desktop, right click on the patients folder, go to “Send to”, and select “Compressed (zipped) folder”. A duplicate folder will be made with either a zipper on it, or a blue “Z”. (*** If following a Dual Scan Protocol, please zip scans individually and label accordingly; i.e: “Patient Scan” and “Denture Scan” ***)
8. To upload the compressed folder, login to Implant Concierge. Click on the patient’s name to open the case. Click on the red “Upload DICOM” button.
9. Drag and drop the folder from the desktop to Implant Concierge. The file will automatically begin uploading.
10. Once the file reaches 100%, click the green “Complete” button.
Exporting from Owandy
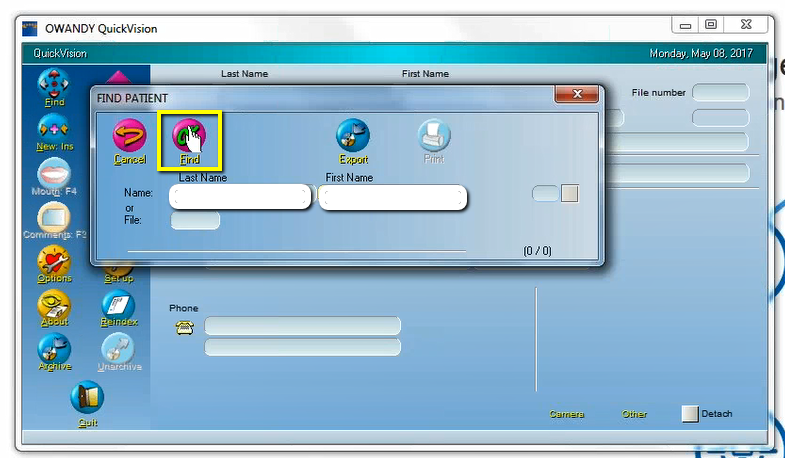
2. Open the Owandy software. Type in the patients name and click “Find”.
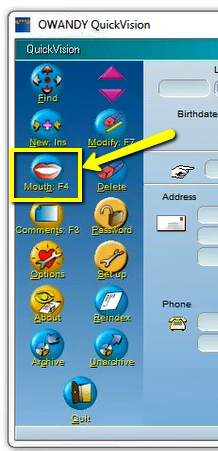
 3. Once the patients information appears, click the “Mouth” icon located on the left hand side of your screen.
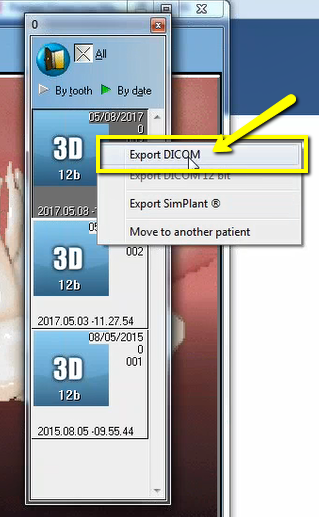
 4. Find the most recent CBCT scan. Right click on the 3D image, and choose “Export DICOM”.
 5. A pop-up will appear with the save location. Select the folder you just created on the desktop and click “OK”.
6. After the DICOM exports and saves, go to the patients folder and verify the .dcm files were exported correctly; there should be several hundred files.
5. A pop-up will appear with the save location. Select the folder you just created on the desktop and click “OK”.
6. After the DICOM exports and saves, go to the patients folder and verify the .dcm files were exported correctly; there should be several hundred files.
 7. Go back to the desktop, right click on the patients folder, go to “Send to”, and select “Compressed (zipped) folder”. A duplicate folder will be made with either a zipper on it, or a blue “Z”. (*** If following a Dual Scan Protocol, please zip scans individually and label accordingly; i.e: “Patient Scan” and “Denture Scan” ***)
8. To upload the compressed folder, login to Implant Concierge. Click on the patient’s name to open the case. Click on the red “Upload DICOM” button.
9. Drag and drop the folder from the desktop to Implant Concierge. The file will automatically begin uploading.
10. Once the file reaches 100%, click the green “Complete” button.
7. Go back to the desktop, right click on the patients folder, go to “Send to”, and select “Compressed (zipped) folder”. A duplicate folder will be made with either a zipper on it, or a blue “Z”. (*** If following a Dual Scan Protocol, please zip scans individually and label accordingly; i.e: “Patient Scan” and “Denture Scan” ***)
8. To upload the compressed folder, login to Implant Concierge. Click on the patient’s name to open the case. Click on the red “Upload DICOM” button.
9. Drag and drop the folder from the desktop to Implant Concierge. The file will automatically begin uploading.
10. Once the file reaches 100%, click the green “Complete” button.
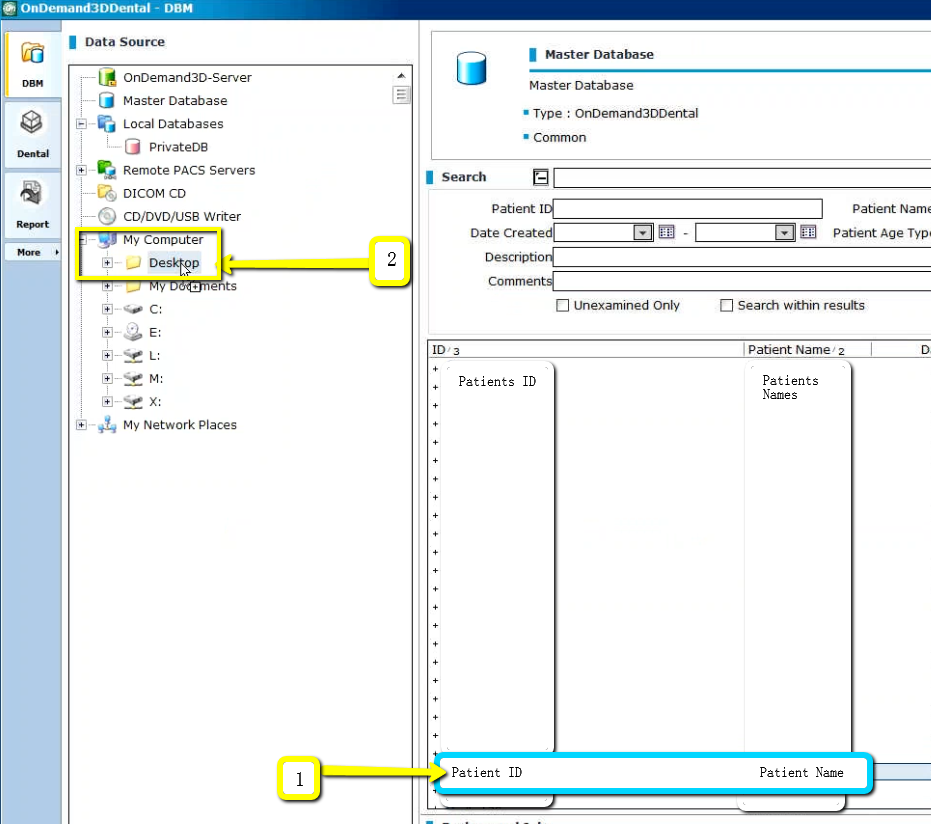
Exporting from Pancorp Encompass
2. In the “Master Database”, click on the patient scan to select it, but do not open it. On the left of your screen under “Data Source”, click on the plus sign next to “My Computer” to expand the options. Left click on the patient scan and drag it to the Desktop.
 3. A pop up will appear containing the multi-file DICOM. You can verify this by ensuring that there are several hundred files, and that the files end in .dcm.
4. Go to the desktop, right click on the patients folder, go to “Send to”, and select “Compressed (zipped) folder”. A duplicate folder will be made with either a zipper on it, or a blue “Z”. (*** If following a Dual Scan Protocol, please zip scans individually and label accordingly; i.e: “Patient Scan” and “Denture Scan” ***)
5. To upload the compressed folder, login to Implant Concierge. Click on the patient’s name to open the case. Click on the red “Upload DICOM” button.
6. Drag and drop the folder from the desktop to Implant Concierge. The file will automatically begin uploading.
7. Once the file reaches 100%, click the green “Complete” button.
3. A pop up will appear containing the multi-file DICOM. You can verify this by ensuring that there are several hundred files, and that the files end in .dcm.
4. Go to the desktop, right click on the patients folder, go to “Send to”, and select “Compressed (zipped) folder”. A duplicate folder will be made with either a zipper on it, or a blue “Z”. (*** If following a Dual Scan Protocol, please zip scans individually and label accordingly; i.e: “Patient Scan” and “Denture Scan” ***)
5. To upload the compressed folder, login to Implant Concierge. Click on the patient’s name to open the case. Click on the red “Upload DICOM” button.
6. Drag and drop the folder from the desktop to Implant Concierge. The file will automatically begin uploading.
7. Once the file reaches 100%, click the green “Complete” button.
Exporting from Planmeca
2. Open patient’s scan. At the top of the screen, hover over the drop down menu. In the “Output” section, select “Export Volume”.
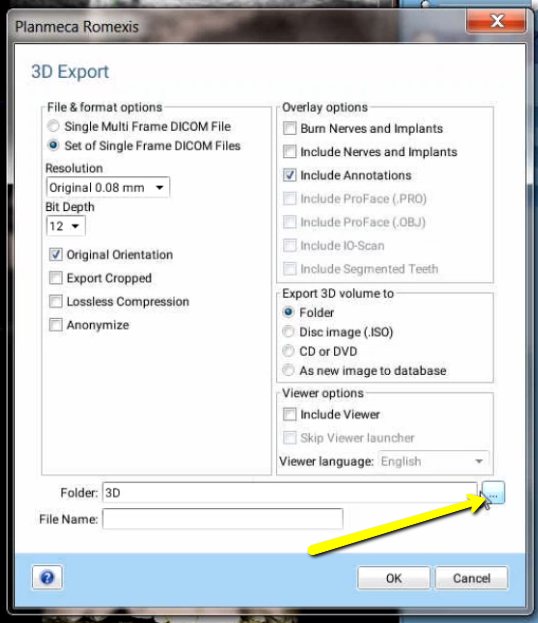
3. A pop up box will appear. Select “Set of Single Frame DICOM Files”. (No other options should have to be changed).
 4. Click on the “…” button to choose where to files export to.
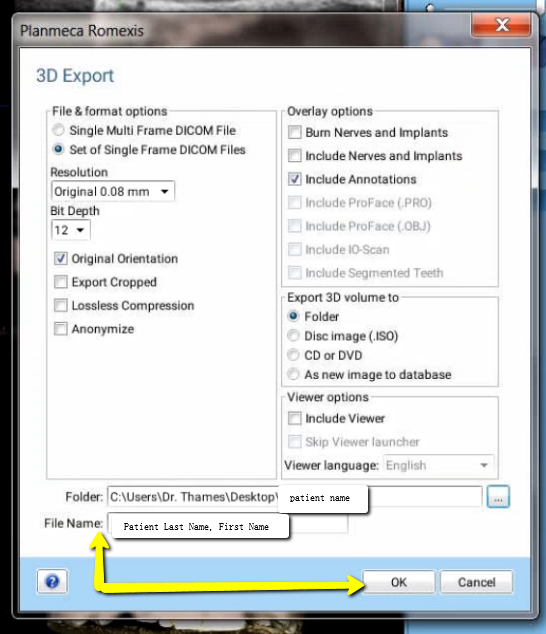
 5. A second pop up box will appear. Go to the desktop, select the patients folder, and click “OK”
6. The second pop-up box will disappear. Under the file name, type “Patient Last Name, First Name”. Click “OK”. Files will begin to export.
5. A second pop up box will appear. Go to the desktop, select the patients folder, and click “OK”
6. The second pop-up box will disappear. Under the file name, type “Patient Last Name, First Name”. Click “OK”. Files will begin to export.
 7. After the DICOM exports, go to the patients folder and verify the .dcm files were exported correctly; there should be several hundred files.
8. Go back to the desktop, right click on the patients folder, go to “Send to”, and select “Compressed (zipped) folder”. A duplicate folder will be made with either a zipper on it, or a blue “Z”. (*** If following a Dual Scan Protocol, please zip scans individually and label accordingly; i.e: “Patient Scan” and “Denture Scan” ***)
9. To upload the compressed folder, login to Implant Concierge. Click on the patient’s name to open the case. Click on the red “Upload DICOM” button.
10. Drag and drop the folder from the desktop to Implant Concierge. The file will automatically begin uploading.
11. Once the file reaches 100%, click the green “Complete” button.
7. After the DICOM exports, go to the patients folder and verify the .dcm files were exported correctly; there should be several hundred files.
8. Go back to the desktop, right click on the patients folder, go to “Send to”, and select “Compressed (zipped) folder”. A duplicate folder will be made with either a zipper on it, or a blue “Z”. (*** If following a Dual Scan Protocol, please zip scans individually and label accordingly; i.e: “Patient Scan” and “Denture Scan” ***)
9. To upload the compressed folder, login to Implant Concierge. Click on the patient’s name to open the case. Click on the red “Upload DICOM” button.
10. Drag and drop the folder from the desktop to Implant Concierge. The file will automatically begin uploading.
11. Once the file reaches 100%, click the green “Complete” button.
Exporting from PreXion
1. On your desktop, right click on an empty space. Go to “New” and click “Folder”. A folder will appear with highlighted blue text. Type in the patient name and push “Enter” on your keyboard.
2. In your PreXion, right click on the patient’s name and go to “Study Management” and click “Download Study”.
3. Select the folder you just created on the desktop. Click “OK” to export the images.
4. After the DICOM exports and saves, go to the patients folder and verify the .dcm files were exported correctly; there should be several hundred files.
5. Go back to the desktop, right click on the patients folder, go to “Send to”, and select “Compressed (zipped) folder”. A duplicate folder will be made with either a zipper on it, or a blue “Z”. (*** If following a Dual Scan Protocol, please zip scans individually and label accordingly; i.e: “Patient Scan” and “Denture Scan” ***)
6. To upload the compressed folder, login to Implant Concierge. Click on the patient’s name to open the case. Click on the red “Upload DICOM” button.
7. Drag and drop the folder from the desktop to Implant Concierge. The file will automatically begin uploading.
8. Once the file reaches 100%, click the green “Complete” button.
Exporting from Rayscan
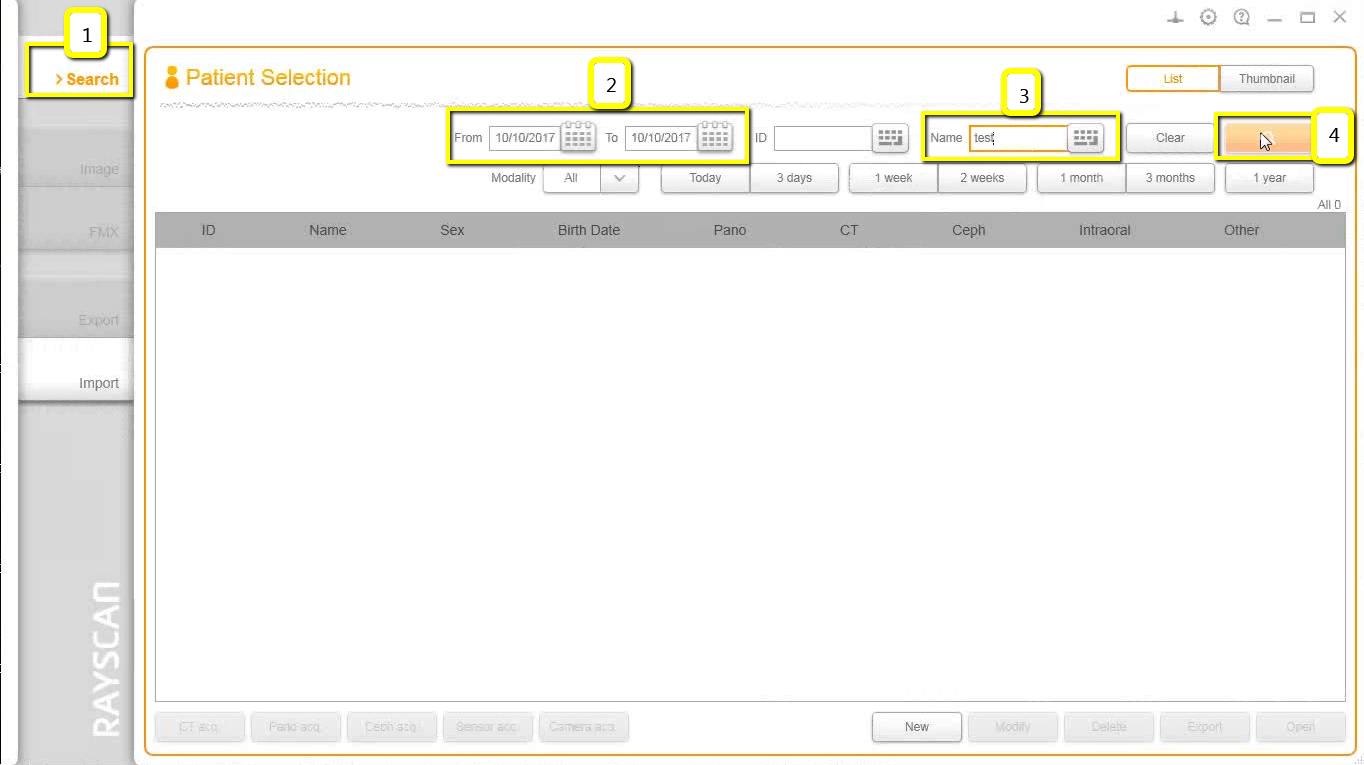
1. On your desktop, right click on an empty space. Go to “New” and click “Folder”. A folder will appear with highlighted blue text. Type in the patient name and push “Enter” on your keyboard.
2. Open the Rayscan software and in the “Search” tab, select the correct dates, and type in the patient’s name. Click the orange magnifying glass button to search.
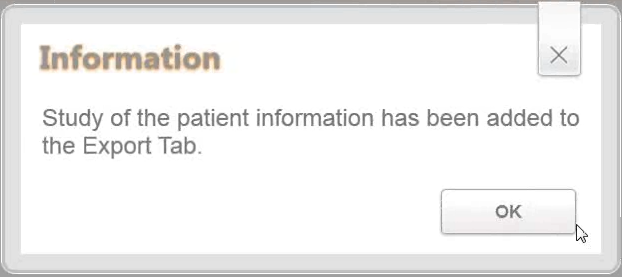
3. Select the correct file and click “Export”. You will get a pop-up verifying that the patient information has been added to the export tab. Click “OK”

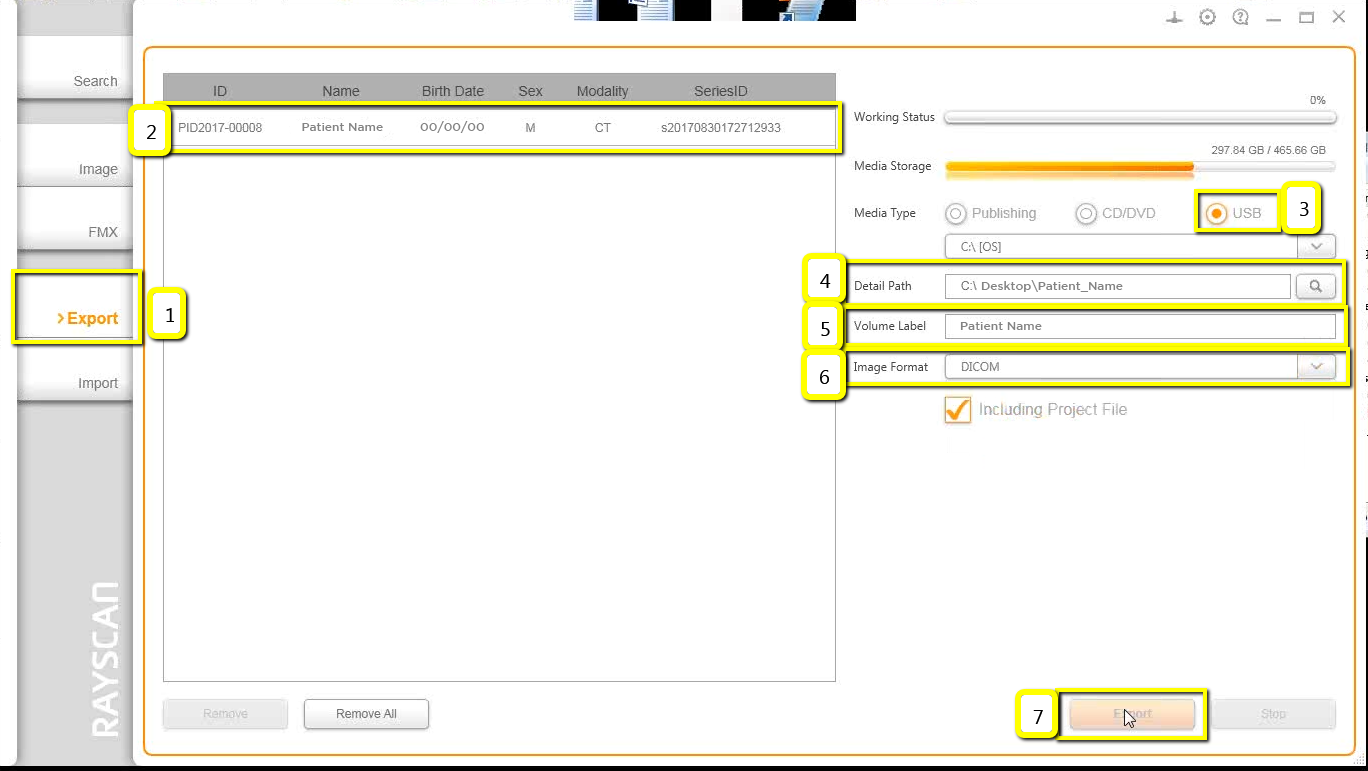
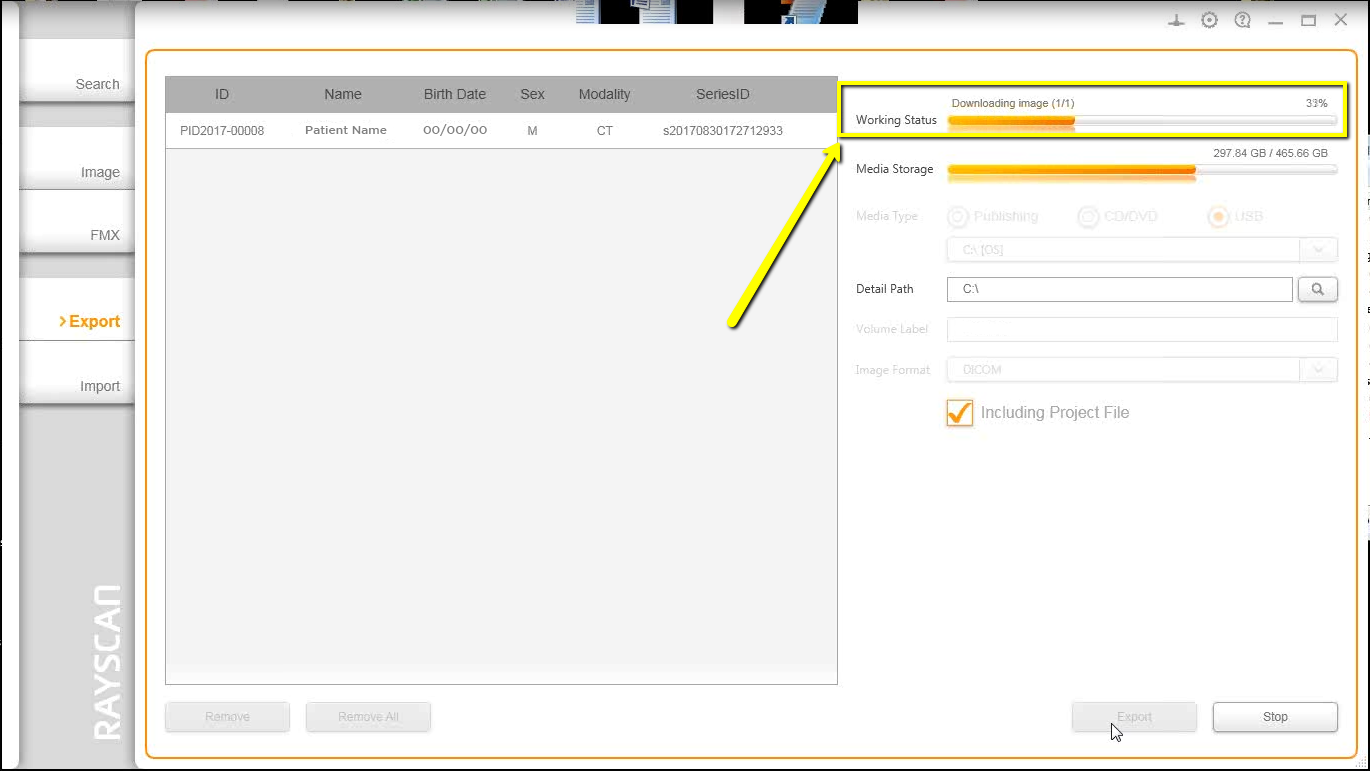
4. Click on the “Export” tab and select the correct patient information. To the right-hand side, you will have different exporting options. For media type, select “USB”. For “Detail Path” click on magnifying glass button. A pop-up will appear for the save location. Select the folder we just made on the desktop and click “OK”. Type in the patient’s name next to “Volume Label”. For the “Image Format” choose DICOM. Click “Export”.
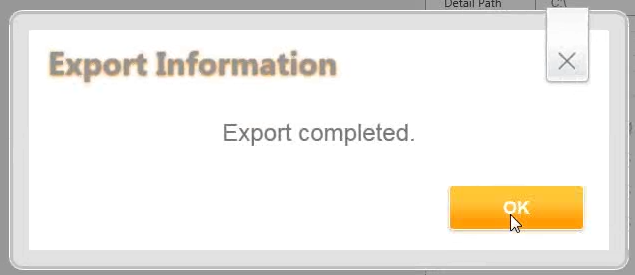
5. The export will begin working. Once the export reaches 100%, you will get a pop-up stating it is complete. Click “OK”.
6. After the DICOM exports and saves, go to the patient’s folder and verify the .dcm files were exported correctly; there should be several hundred files.
7. Go back to the desktop, right-click on the patient’s folder, go to “Send to”, and select “Compressed (zipped) folder”. A duplicate folder will be made with either a zipper on it, or a blue “Z”. (*** If following a Dual Scan Protocol, please zip scans individually and label accordingly; i.e: “Patient Scan” and “Denture Scan” ***)
8. To upload the compressed folder, login to Implant Concierge. Click on the patient’s name to open the case. Click on the red “Upload DICOM” button.
9. Drag and drop the folder from the desktop to Implant Concierge. The file will automatically begin uploading.
10. Once the file reaches 100%, click the green “Complete” button.
Exporting from Sidexis 4
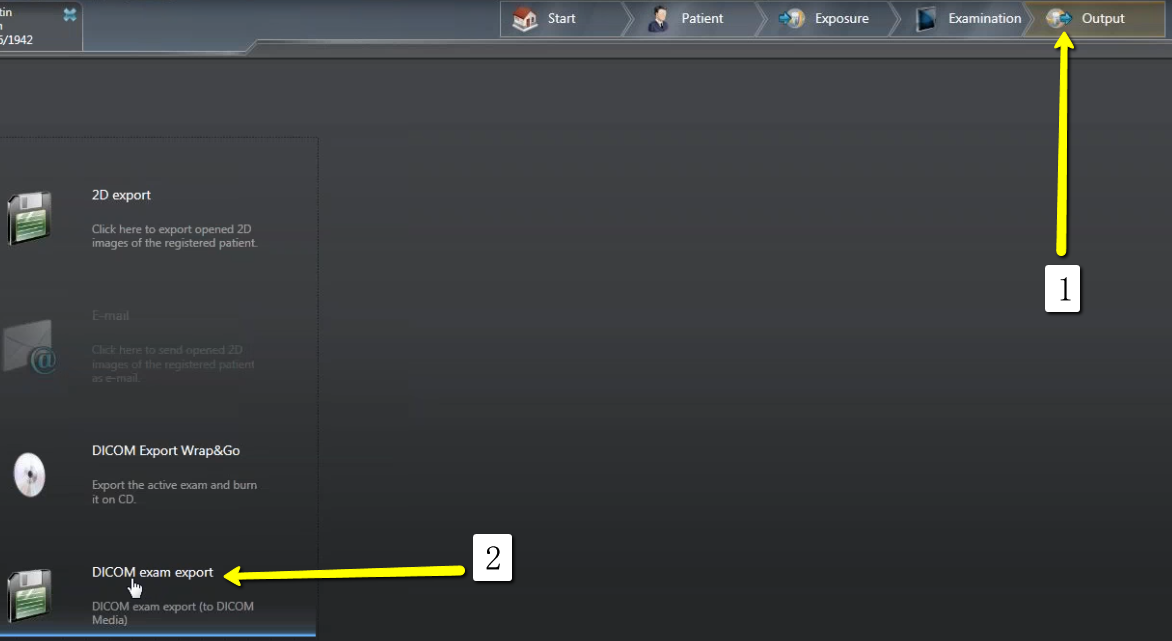
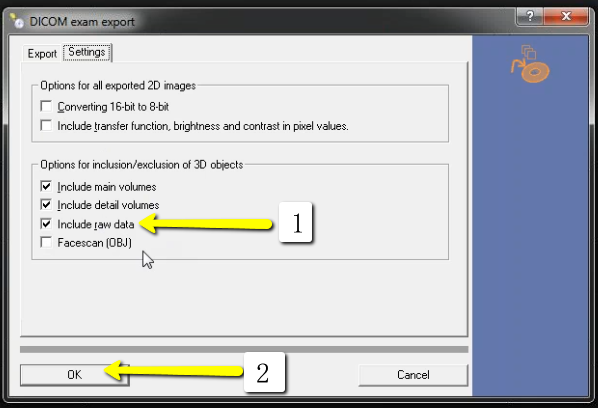
2. Go to patient scan and click on “Output”, then “DICOM Exam Export”.
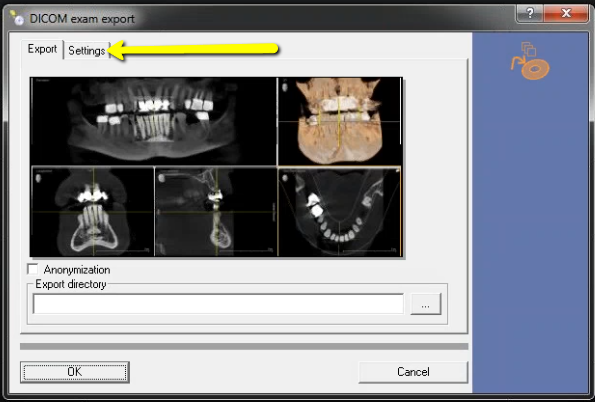
 3. An additional window should pop up with the patient scan. Click on “Settings”.
 4. Please ensure that “Include Raw Data” is selected. No other options should have to change. Click “OK”.
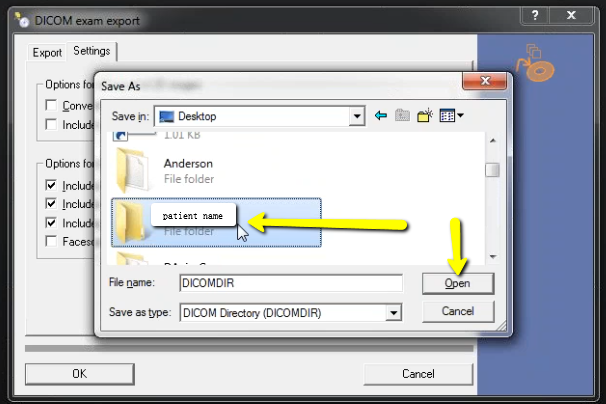
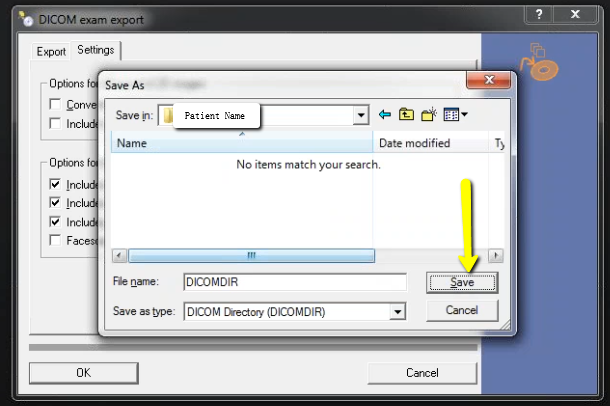
 5. Another window should pop up for a save location. Select the folder you just created on the desktop and click “Open”, then “Save”.
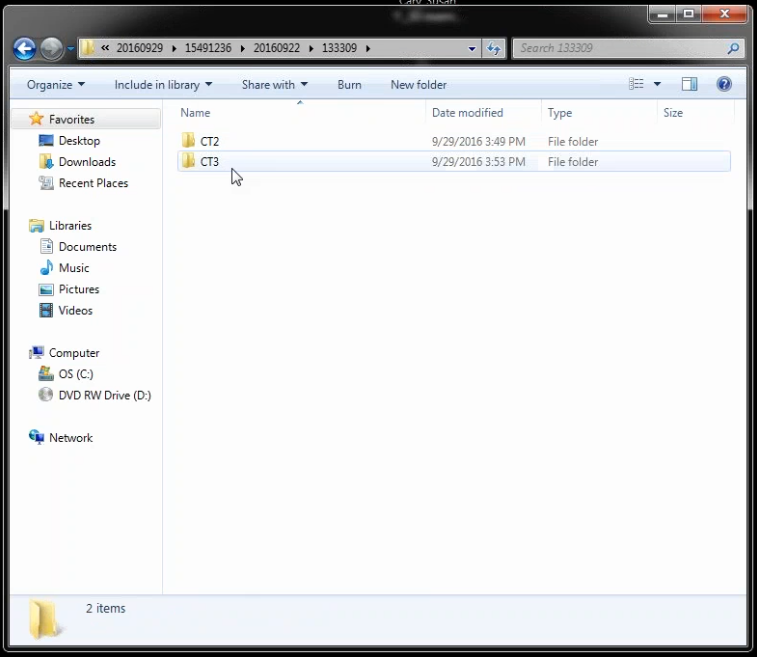
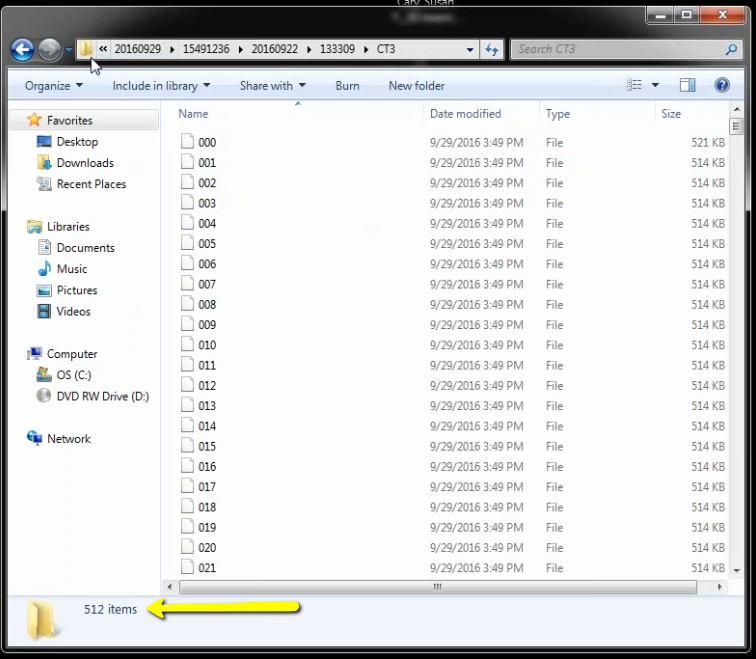
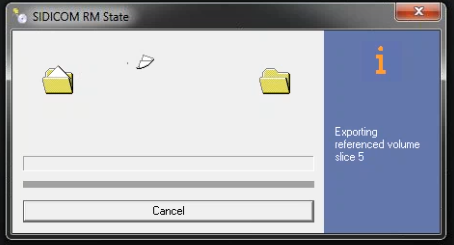 7. After the DICOM exports and saves, go to the folder and look for the sub folder named “CT3” (you may have to open a few folders before you see it). Verify the files were exported correctly; there should be several hundred files.
 8. Go back to the desktop, right click on the patients folder, go to “Send to”, and select “Compressed (zipped) folder”. A duplicate folder will be made with either a zipper on it, or a blue “Z”. (*** If following a Dual Scan Protocol, please zip scans individually and label accordingly; i.e: “Patient Scan” and “Denture Scan” ***)
9. To upload the compressed folder, login to Implant Concierge. Click on the patient’s name to open the case. Click on the red “Upload DICOM” button.
10. Drag and drop the folder from the desktop to Implant Concierge. The file will automatically begin uploading.
11. Once the file reaches 100%, click the green “Complete” button.
8. Go back to the desktop, right click on the patients folder, go to “Send to”, and select “Compressed (zipped) folder”. A duplicate folder will be made with either a zipper on it, or a blue “Z”. (*** If following a Dual Scan Protocol, please zip scans individually and label accordingly; i.e: “Patient Scan” and “Denture Scan” ***)
9. To upload the compressed folder, login to Implant Concierge. Click on the patient’s name to open the case. Click on the red “Upload DICOM” button.
10. Drag and drop the folder from the desktop to Implant Concierge. The file will automatically begin uploading.
11. Once the file reaches 100%, click the green “Complete” button.
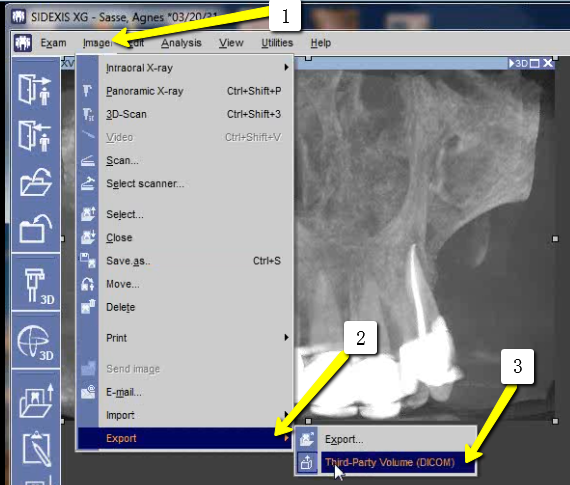
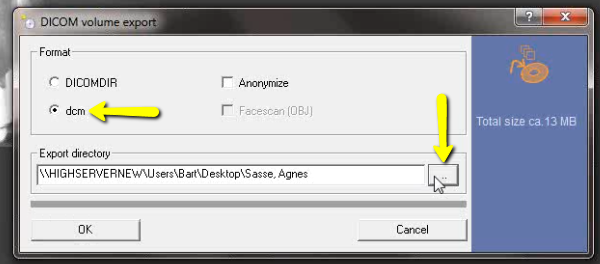
Exporting from Sidexis XG
2. Go to patient scan and click on “Output”, then “DICOM Exam Export”.
3. Select “Image”, “Export”, and click “Export Third Party DICOM”.
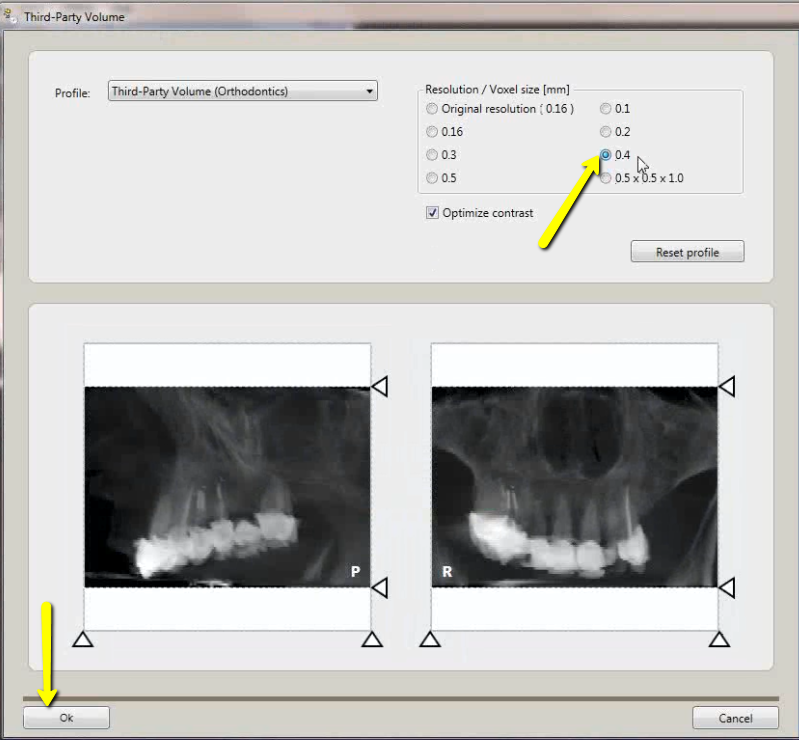
 4. Select “0.4 Voxels”, and click “OK”.
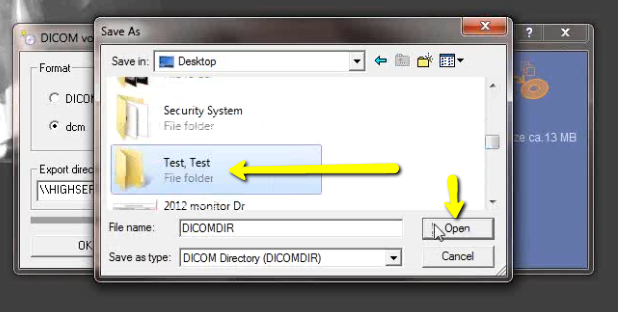
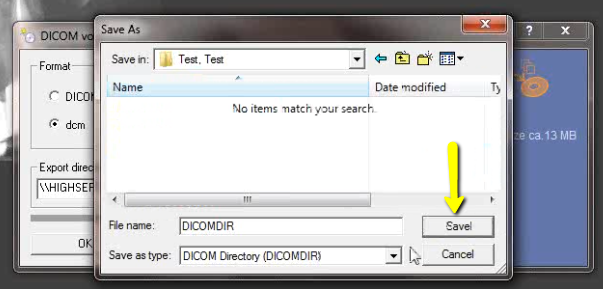
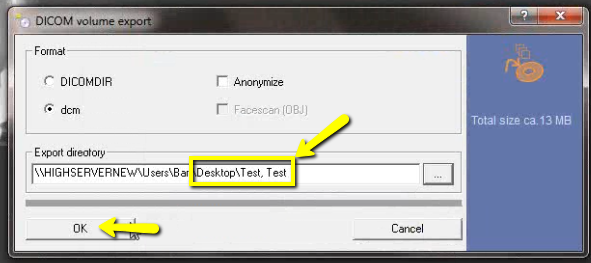
 5. Click “dcm” and under the Export Directory section, click the “…” box to select the folder on your Desktop labeled with the patients name. Click “Open” then “Save!”.

 7. After the DICOM exports, go to the patients folder and verify the .dcm files were exported correctly; there should be several hundred files.
8. Go back to the desktop, right click on the patients folder, go to “Send to”, and select “Compressed (zipped) folder”. A duplicate folder will be made with either a zipper on it, or a blue “Z”. (*** If following a Dual Scan Protocol, please zip scans individually and label accordingly; i.e: “Patient Scan” and “Denture Scan” ***)
9. To upload the compressed folder, login to Implant Concierge. Click on the patient’s name to open the case. Click on the red “Upload DICOM” button.
10. Drag and drop the folder from the desktop to Implant Concierge. The file will automatically begin uploading.
11. Once the file reaches 100%, click the green “Complete” button.
7. After the DICOM exports, go to the patients folder and verify the .dcm files were exported correctly; there should be several hundred files.
8. Go back to the desktop, right click on the patients folder, go to “Send to”, and select “Compressed (zipped) folder”. A duplicate folder will be made with either a zipper on it, or a blue “Z”. (*** If following a Dual Scan Protocol, please zip scans individually and label accordingly; i.e: “Patient Scan” and “Denture Scan” ***)
9. To upload the compressed folder, login to Implant Concierge. Click on the patient’s name to open the case. Click on the red “Upload DICOM” button.
10. Drag and drop the folder from the desktop to Implant Concierge. The file will automatically begin uploading.
11. Once the file reaches 100%, click the green “Complete” button.
Exporting from Triana
2. Select the patient in the database and click “Export”.
 3. Select the scan and click the button “. . .” and a pop up will appear for the save location. Select the folder we just made on the desktop and click “OK”.
 4. The pop up will disappear. Verify you have the correct folder selected and click “Run”. A bar will begin loading.
 5. After the DICOM exports and saves, go to the patients’ folder and double click to open. Double click on the study.
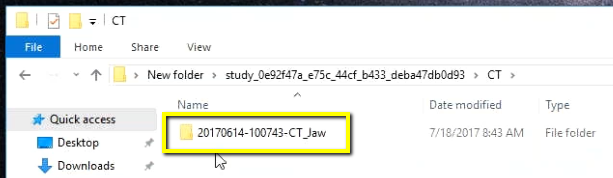
 Double click on “CT”.
 Double click on the “CT_Jaw” folder.
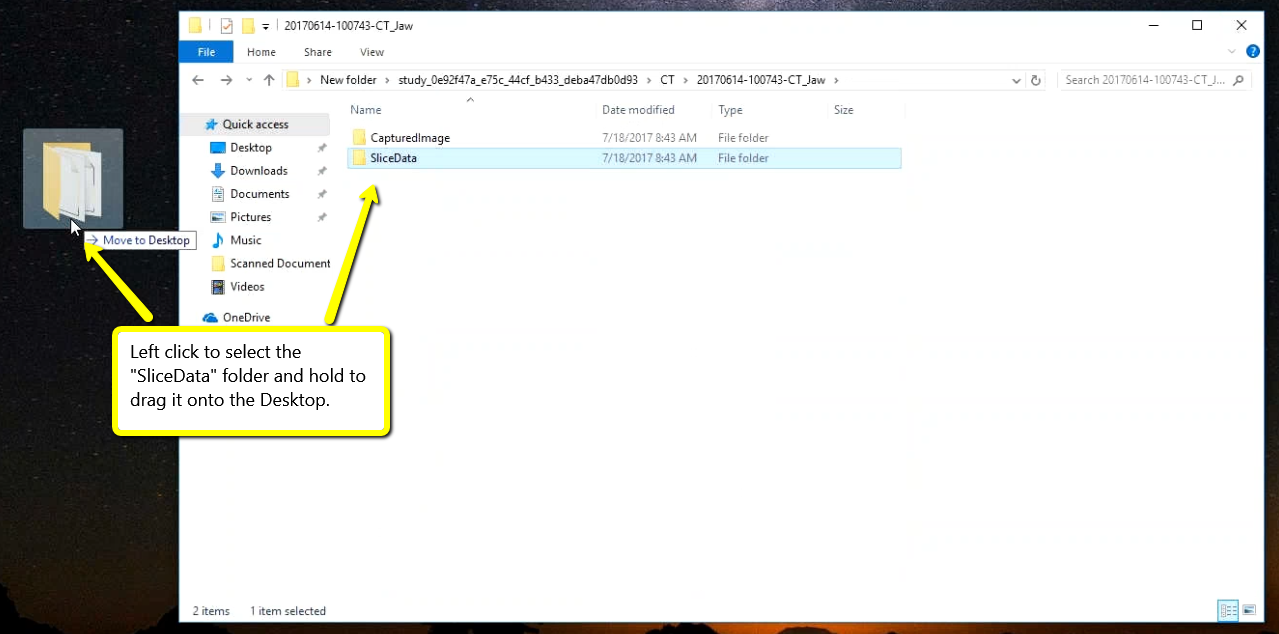
 Double click on “Slice Data”. This folder should contain the multi-file DICOM.
6. Drag the SliceData folder to the Desktop.
Double click on “Slice Data”. This folder should contain the multi-file DICOM.
6. Drag the SliceData folder to the Desktop.
 7. Right click on the patients folder, go to “Send to”, and select “Compressed (zipped) folder”. A duplicate folder will be made with either a zipper on it, or a blue “Z”. (*** If following a Dual Scan Protocol, please zip scans individually and label accordingly; i.e: “Patient Scan” and “Denture Scan” ***)
8. To upload the compressed folder, login to Implant Concierge. Click on the patient’s name to open the case. Click on the red “Upload DICOM” button.
9. Drag and drop the folder from the desktop to Implant Concierge. The file will automatically begin uploading.
10. Once the file reaches 100%, click the green “Complete” button.
7. Right click on the patients folder, go to “Send to”, and select “Compressed (zipped) folder”. A duplicate folder will be made with either a zipper on it, or a blue “Z”. (*** If following a Dual Scan Protocol, please zip scans individually and label accordingly; i.e: “Patient Scan” and “Denture Scan” ***)
8. To upload the compressed folder, login to Implant Concierge. Click on the patient’s name to open the case. Click on the red “Upload DICOM” button.
9. Drag and drop the folder from the desktop to Implant Concierge. The file will automatically begin uploading.
10. Once the file reaches 100%, click the green “Complete” button.
Exporting from TxSTUDIO / Invivo5
2. Open your image and click on “File”, “Save As”, “Multi File DICOM with .dcm”, and click “OK”.
3. Select the folder you just created on the desktop and click “OK”.
4. Please ensure that “Uncompressed” is selected and click “OK”.
5. Your files will begin exporting. Click “OK” when the files save.
6. After the DICOM exports and saves, go to the patients folder and verify the .dcm files were exported correctly; there should be several hundred files.
7. Go back to the desktop, right click on the patients folder, go to “Send to”, and select “Compressed (zipped) folder”. A duplicate folder will be made with either a zipper on it, or a blue “Z”. (*** If following a Dual Scan Protocol, please zip scans individually and label accordingly; i.e: “Patient Scan” and “Denture Scan” ***)
8. To upload the compressed folder, login to Implant Concierge. Click on the patient’s name to open the case. Click on the red “Upload DICOM” button.
9. Drag and drop the folder from the desktop to Implant Concierge. The file will automatically begin uploading.
10. Once the file reaches 100%, click the green “Complete” button.
Exporting from VaTech (3DPlus)
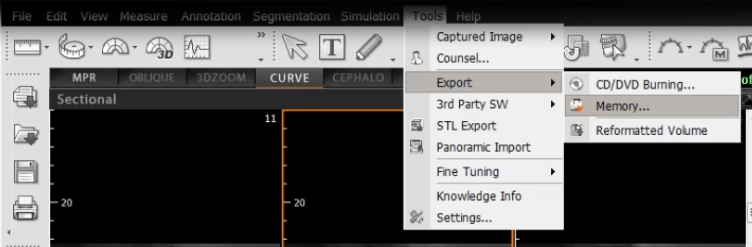
2. In your VaTech, open your image, click on “Tools”, click “Export”, and click “Memory”.
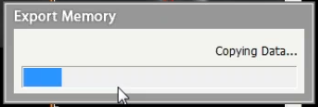
 3. Select the folder you just created on your desktop. Click “OK” to export images.
 4. After the DICOM exports and saves, go to the patients folder and verify the .dcm files were exported correctly; there should be several hundred files.
6. To upload the compressed folder, login to Implant Concierge. Click on the patient’s name to open the case. Click on the red “Upload DICOM” button.
7. Drag and drop the folder from the desktop to Implant Concierge. The file will automatically begin uploading.
8. Once the file reaches 100%, click the green “Complete” button.
4. After the DICOM exports and saves, go to the patients folder and verify the .dcm files were exported correctly; there should be several hundred files.
6. To upload the compressed folder, login to Implant Concierge. Click on the patient’s name to open the case. Click on the red “Upload DICOM” button.
7. Drag and drop the folder from the desktop to Implant Concierge. The file will automatically begin uploading.
8. Once the file reaches 100%, click the green “Complete” button.
Exporting from VaTech (Ez3D-i)
2. In your VaTech, open the patient scan. Click on “Main Menu”, then “Export”.
3. A pop up box will appear. For “Save Type”, select “Local Disk”. For Compression, select “Looseless”. Then check the items that you would like to export. Implant Concierge requires only the “DCM Files”. However, if you are a scanning site and would like to send the viewer to the Doctor, select “Viewer”. If you are wanting to export your treatment plan, select “Project File”. Then, click “Save”
 4. A second pop-up will appear for the save location. Select the folder you just created on the desktop, and click “Select Folder”. The DICOM files will begin to export. Once the files are exported, you will get a confirmation pop-up. Click “OK”.
5. After the DICOM exports, go to the patients folder and verify the .dcm files were exported correctly; there should be several hundred files.
4. A second pop-up will appear for the save location. Select the folder you just created on the desktop, and click “Select Folder”. The DICOM files will begin to export. Once the files are exported, you will get a confirmation pop-up. Click “OK”.
5. After the DICOM exports, go to the patients folder and verify the .dcm files were exported correctly; there should be several hundred files.
 6. To upload the compressed folder, login to Implant Concierge. Click on the patient’s name to open the case. Click on the red “Upload DICOM” button.
7. Drag and drop the folder from the desktop to Implant Concierge. The file will automatically begin uploading.
8. Once the file reaches 100%, click the green “Complete” button.
6. To upload the compressed folder, login to Implant Concierge. Click on the patient’s name to open the case. Click on the red “Upload DICOM” button.
7. Drag and drop the folder from the desktop to Implant Concierge. The file will automatically begin uploading.
8. Once the file reaches 100%, click the green “Complete” button.
Exporting from VaTech (Ez3D-i)
1. On your desktop, right click on an empty space. Go to “New” and click “Folder”. A folder will appear with highlighted blue text. Type in the patient name and push “Enter” on your keyboard.
2. In your VaTech, select your patient and right click on the CBCT scan. Click “Export”. Your files will begin downloading.

3. A pop-up will appear. You should see several hundred .dcm files. Click on “Local Disk”, then “Export”.
4. A second pop-up will appear for the save location. Select the folder you just created on the desktop, and click “Select Folder”. The DICOM files will begin to export. Once the files are exported, you will get a confirmation pop-up. Click “OK”.
5. After the DICOM exports, go to the patients folder and verify the .dcm files were exported correctly; there should be several hundred files.
6. Go back to the desktop, right click on the patients folder, go to “Send to”, and select “Compressed (zipped) folder”. A duplicate folder will be made with either a zipper on it, or a blue “Z”. (*** If following a Dual Scan Protocol, please zip scans individually and label accordingly; i.e: “Patient Scan” and “Denture Scan” ***)
6. To upload the compressed folder, login to Implant Concierge. Click on the patient’s name to open the case. Click on the red “Upload DICOM” button.
7. Drag and drop the folder from the desktop to Implant Concierge. The file will automatically begin uploading.
8. Once the file reaches 100%, click the green “Complete” button.