Partially Edentulous CBCT scan of Maxilla
Printable PDF of Scanning Protocol: Partially Edentulous CBCT scan of Maxilla
1. Patient Positioning:
– Breathe through your nose
– Bite gently on cotton rolls
– Close your eyes and place tongue at the back of the mouth
2. Vital Anatomy to be captured:
– Superior: Mid sinus / below orbit
– Inferior: Capture 1-3 mm of mandible dentition

3. CBCT General Settings: Maxl 6cm – 8cm, 0.3 – 0.4 Voxels
4. Export and Upload CBCT Scan
– Export the CBCT scan in a multi-file DICOM format to the desktop
– Right click on the folder, go to “Send To”, and select “Compressed (Zipped) Folder”
– Upload the zipped/compressed folder to Implant Concierge
5. Ship the diagnostic model to Implant Concierge.
More information on exporting the DICOM files from your specific CBCT machine can be found under the “Exporting DICOM” section.
For assistance in printing a shipping label, please visit “Print a Shipping Label” in the “How To” section.
Partially Edentulous CBCT scan of Mandible
Printable PDF of Scanning Protocol: Partially Edentulous CBCT scan of Mandible
1. Patient Positioning:
– Breathe through your nose
– Bite gently on cotton rolls
– Close your eyes and place tongue at the back of the mouth
2. Vital Anatomy to be captured:
– Superior Capture 1-3 mm of maxilla dentition
– Inferior: Capture full mandible
3. CBCT General Settings: Mand 6cm – 8cm, 0.3 – 0.4 Voxel
4. Export and Upload CBCT Scan
– Export the CBCT scan in a multi-file DICOM format to the desktop
– Right click on the folder, go to “Send To”, and select “Compressed (Zipped) Folder”
– Upload the zipped/compressed folder to Implant Concierge
5. Ship the diagnostic model to Implant Concierge
More information on exporting the DICOM files from you specific CBCT machine can be found under the “Exporting DICOM” section.
For assistance in printing a shipping label, please visit “Print a Shipping Label” in the “How To” section.
Partially Edentulous CBCT Scan of Maxilla and Mandible
Printable PDF of Scanning Protocol: Partially Edentulous CBCT Scan of Maxilla and Mandible
1. Patient Positioning:
– Breathe through your nose
– Bite gently on cotton rolls
– Close your eyes and place tongue at the back of your mouth
2. Vital Anatomy to be captured:
– Superior: Sinus (below orbit)
– Inferior: Chin and entire mandible
3. CBCT General Settings: Full 13cm – 20cm, 0.3 – 0.4 Voxel
4. Export and Upload CBCT Scan
– Export the CBCT scan in a multi-file DICOM format to the desktop
– Right click on the folder, go to “Send To”, and select “Compressed (Zipped) Folder”
– Upload the zipped/compressed folder to Implant Concierge
5. Ship the diagnostic model to Implant Concierge
More information on exporting the DICOM files from you specific CBCT machine can be found under the “Exporting DICOM” section.
For assistance in printing a shipping label, please visit “Print a Shipping Label” in the “How To” section.
Fully Edentulous CBCT Scan: Dual Scan Protocol of Maxilla
Printable PDF of Scanning Protocol:
Fully Edentulous CBCT Scan: Dual Scan Protocol of Maxilla
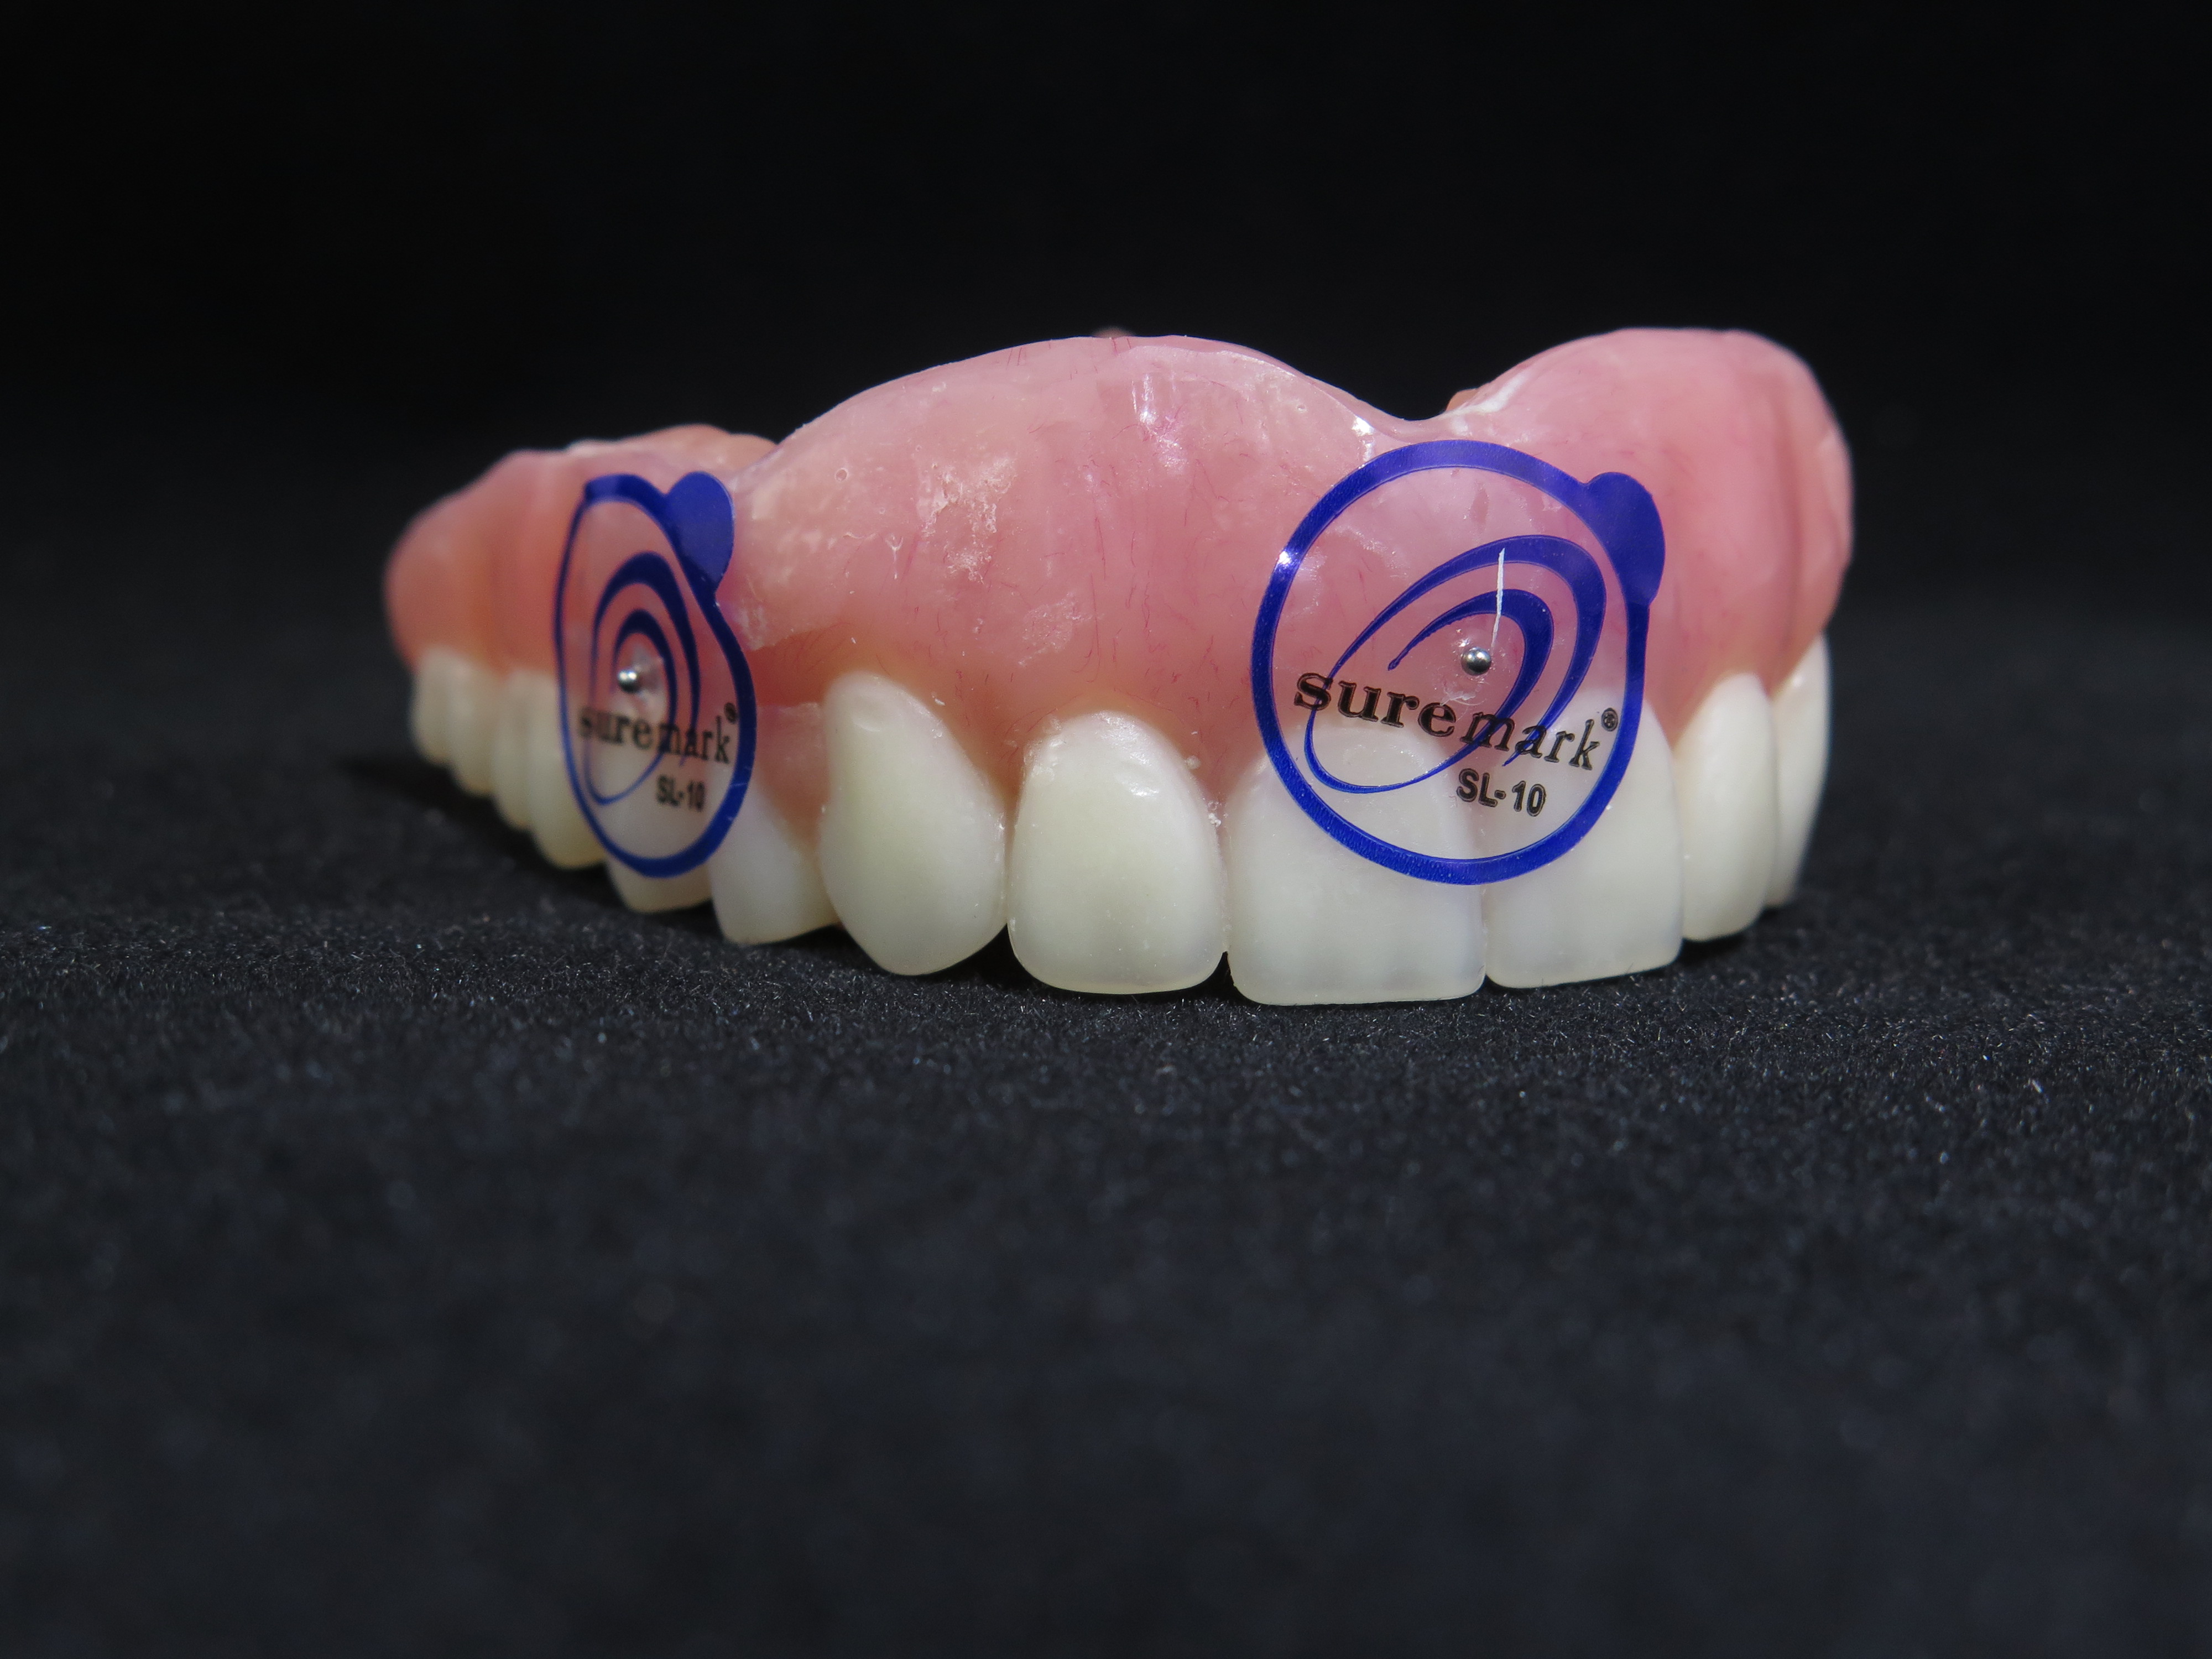
1. On a dry, well-fitting denture, place 6 x-ray markers:
– Place 3 markers on the facial/buccal surface and an additional 3 markers on the palatal surface
– Place the markers on varying axial planes.
– Example: if you place a marker on the buccal area of #2-3, the place your next marker on the lingual area of #4-5 area, the next marker on the facial of #8-9 area and so on.
*Do not place the markers on the intaglio surface of the denture.*


2. Pre-Scan Patient Instructions:
– Use a bite registration for separation, secure fit, and to eliminate rocking
– Confirm fit by asking the patient “Is the denture fitting correctly?”
– Breathe through your nose, close your eyes, and place the tongue at the back of the mouth
3. First Scan: Capture CBCT of ONLY the maxilla denture with the x-ray markers
– Position appliance on a foam block
– Orientate teeth occlusal DOWN
CBCT General Settings: 6cm – 8cm, 0.3 – 0.4 Voxel
4. Second Scan: Capture CBCT of the patient WEARING maxilla denture with x-ray markers.
Vital Anatomy to be captured:
– Superior: Mid Sinus / below orbit
– Inferior: Capture 1-3 mm of mandible dentition
CBCT General Settings: Maxl 6cm – 8cm, 0.3 – 0.4 Voxel
5. When scanning a patient following Dual Scan Protocol:
– Review the scan carefully to ensure there is no “Black Air Space” between the denture and the soft tissue of the patient
Rejected Scan ![]()
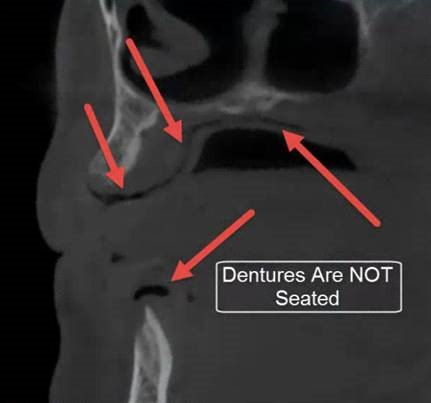
Accepted Scan ![]()

6. Export and Upload CBCT Scans to Implant Concierge
– Export the CBCT scans individually, in a multi-file DICOM format to the desktop
– Right click on each folder, go to “Send To”, and select “Compressed (Zipped) Folder”
– Upload both zipped/compressed folders to Implant Concierge
More information on exporting the DICOM files form you specific CBCT machine can be found under the “Exporting DICOM” section.
Fully Edentulous CBCT Scan: Dual Scan Protocol of Mandible
Printable PDF of Scanning Protocol: Fully Edentulous CBCT Scan: Dual Scan Protocol of Mandible
1. On a dry, well-fitting denture, place 6 x-ray markers:
– Place 3 markers on the facial/buccal surface and an additional 3 markers on the lingual surface
– Place the markers on varying axial planes
– Example: if you place a marker on the buccal area of #28-29, then place your next marker on the lingual of #27-26, the next marker on the facial of #24-25 area and so on
*Do not place the markers on the intaglio surface of the denture*


2. Pre-Scan Patient Instructions:
– Use a bite registration for separation, secure fit, and to eliminate rocking
– Confirm fit by asking the patient “Is the denture fitting correctly?”
– Breathe through your nose, close your eyes, and place the tongue at the back of the mouth
3. First Scan: Capture CBCT of ONLY the mandible denture with the x-ray markers
– Position appliance on a foam block
– Orientate teeth occlusal UP
CBCT General Settings: 6cm – 8cm, 0.3 – 0.4 Voxel
4. Second Scan: Capture CBCT of the patient WEARING mandible denture with x-ray markers
Vital Anatomy to be captured:
– Superior: Capture 1-3 mm of maxilla dentition
– Inferior: Capture mandible with slight clearance below chin
CBCT General Settings: Mand 6cm – 8cm, 0.3 – 0.4 Voxel
5. When scanning a patient following Dual Scan Protocol:
– Review the scan carefully to ensure there is no “Black Air Space” between the denture the soft tissue of the patient
Rejected Scan ![]()
Accepted Scan ![]()
6. Export and Upload CBCT Scans to Implant Concierge
– Export the CBCT scans individually, in a multi-file DICOM format to the desktop
– Right click on each folder, go to “Send To”, and select “Compressed (Zipped) Folder”
– Upload both zipped/compressed folders to Implant Concierge
More information on exporting the DICOM files form you specific CBCT machine can be found under the “Exporting DICOM” section.
Fully Edentulous CBCT Scan: Dual Scan Protocol of Maxilla and Mandible
Printable PDF of Scanning Protocol:
Fully Edentulous CBCT Scan: Dual Scan Protocol of Maxilla and Mandible
1. On a dry, well-fitting denture, place 6 x-ray markers:
– Place 3 markers on the facial/buccal surface and an additional 3 markers on the lingual/palatal surface
– Place the markers on varying axial planes
– Example: if you place a marker on the buccal area of #2-3, then place your next marker on the lingual of #4-5, the next marker on the facial of #8-9 area and so on
*Do not place the markers on the intaglio surface of the denture*


2. Pre-Scan Patient Instructions:
– Use a bite registration for separation, secure fit, and to eliminate rocking
– Confirm fit by asking the patient “Is the denture fitting correctly?”
– Breathe through your nose, close your eyes, and place the tongue at the back of the mouth
3. First Scan: Capture CBCT of ONLY the maxilla denture with x-ray markers.
– Position appliance on a foam block
– Orientate teeth occlusal DOWN
CBCT General Settings: 6cm – 8cm, 0.3 – 0.4 Voxel
4. Second Scan: Capture CBCT of ONLY the mandible denture with x-ray markers.
– Position appliance on a foam block
– Orientate teeth occlusal UP
CBCT General Settings: 6cm – 8cm, 0.3 – .4 Voxel
5. Third Scan: Capture CBCT of patient WEARING maxilla AND mandible dentures with x-ray markers.
Vital Anatomy to be captured:
– Superior: Mid sinus / below orbit
– Inferior: Chin and entire mandible
CBCT General Settings: Full 13cm – 20cm, 0.3 – 0.4 Voxel
6. When scanning a patient following Dual Scan Protocol:
– Review the scan carefully to ensure there is no “Black Air Space” between the denture and the soft tissue of the patient
Rejected Scan ![]()
Accepted Scan ![]()
7. Export and Upload the CBCT Scans to Implant Concierge
– Export the CBCT scans individually, in a multi-file DICOM format to the desktop
– Right click on each folder, go to “Send To”, and select “Compressed (Zipped) Folder”
– Upload both zipped/compressed folders to Implant Concierge
More information on exporting the DICOM files form you specific CBCT machine can be found under the “Exporting DICOM” section.
Fully Edentulous CBCT Scan: Alternate Dual Scan Protocol of Maxilla
Printable PDF of Scanning Protocol:
Fully Edentulous CBCT Scan: Alternate Dual Scan Protocol of Maxilla
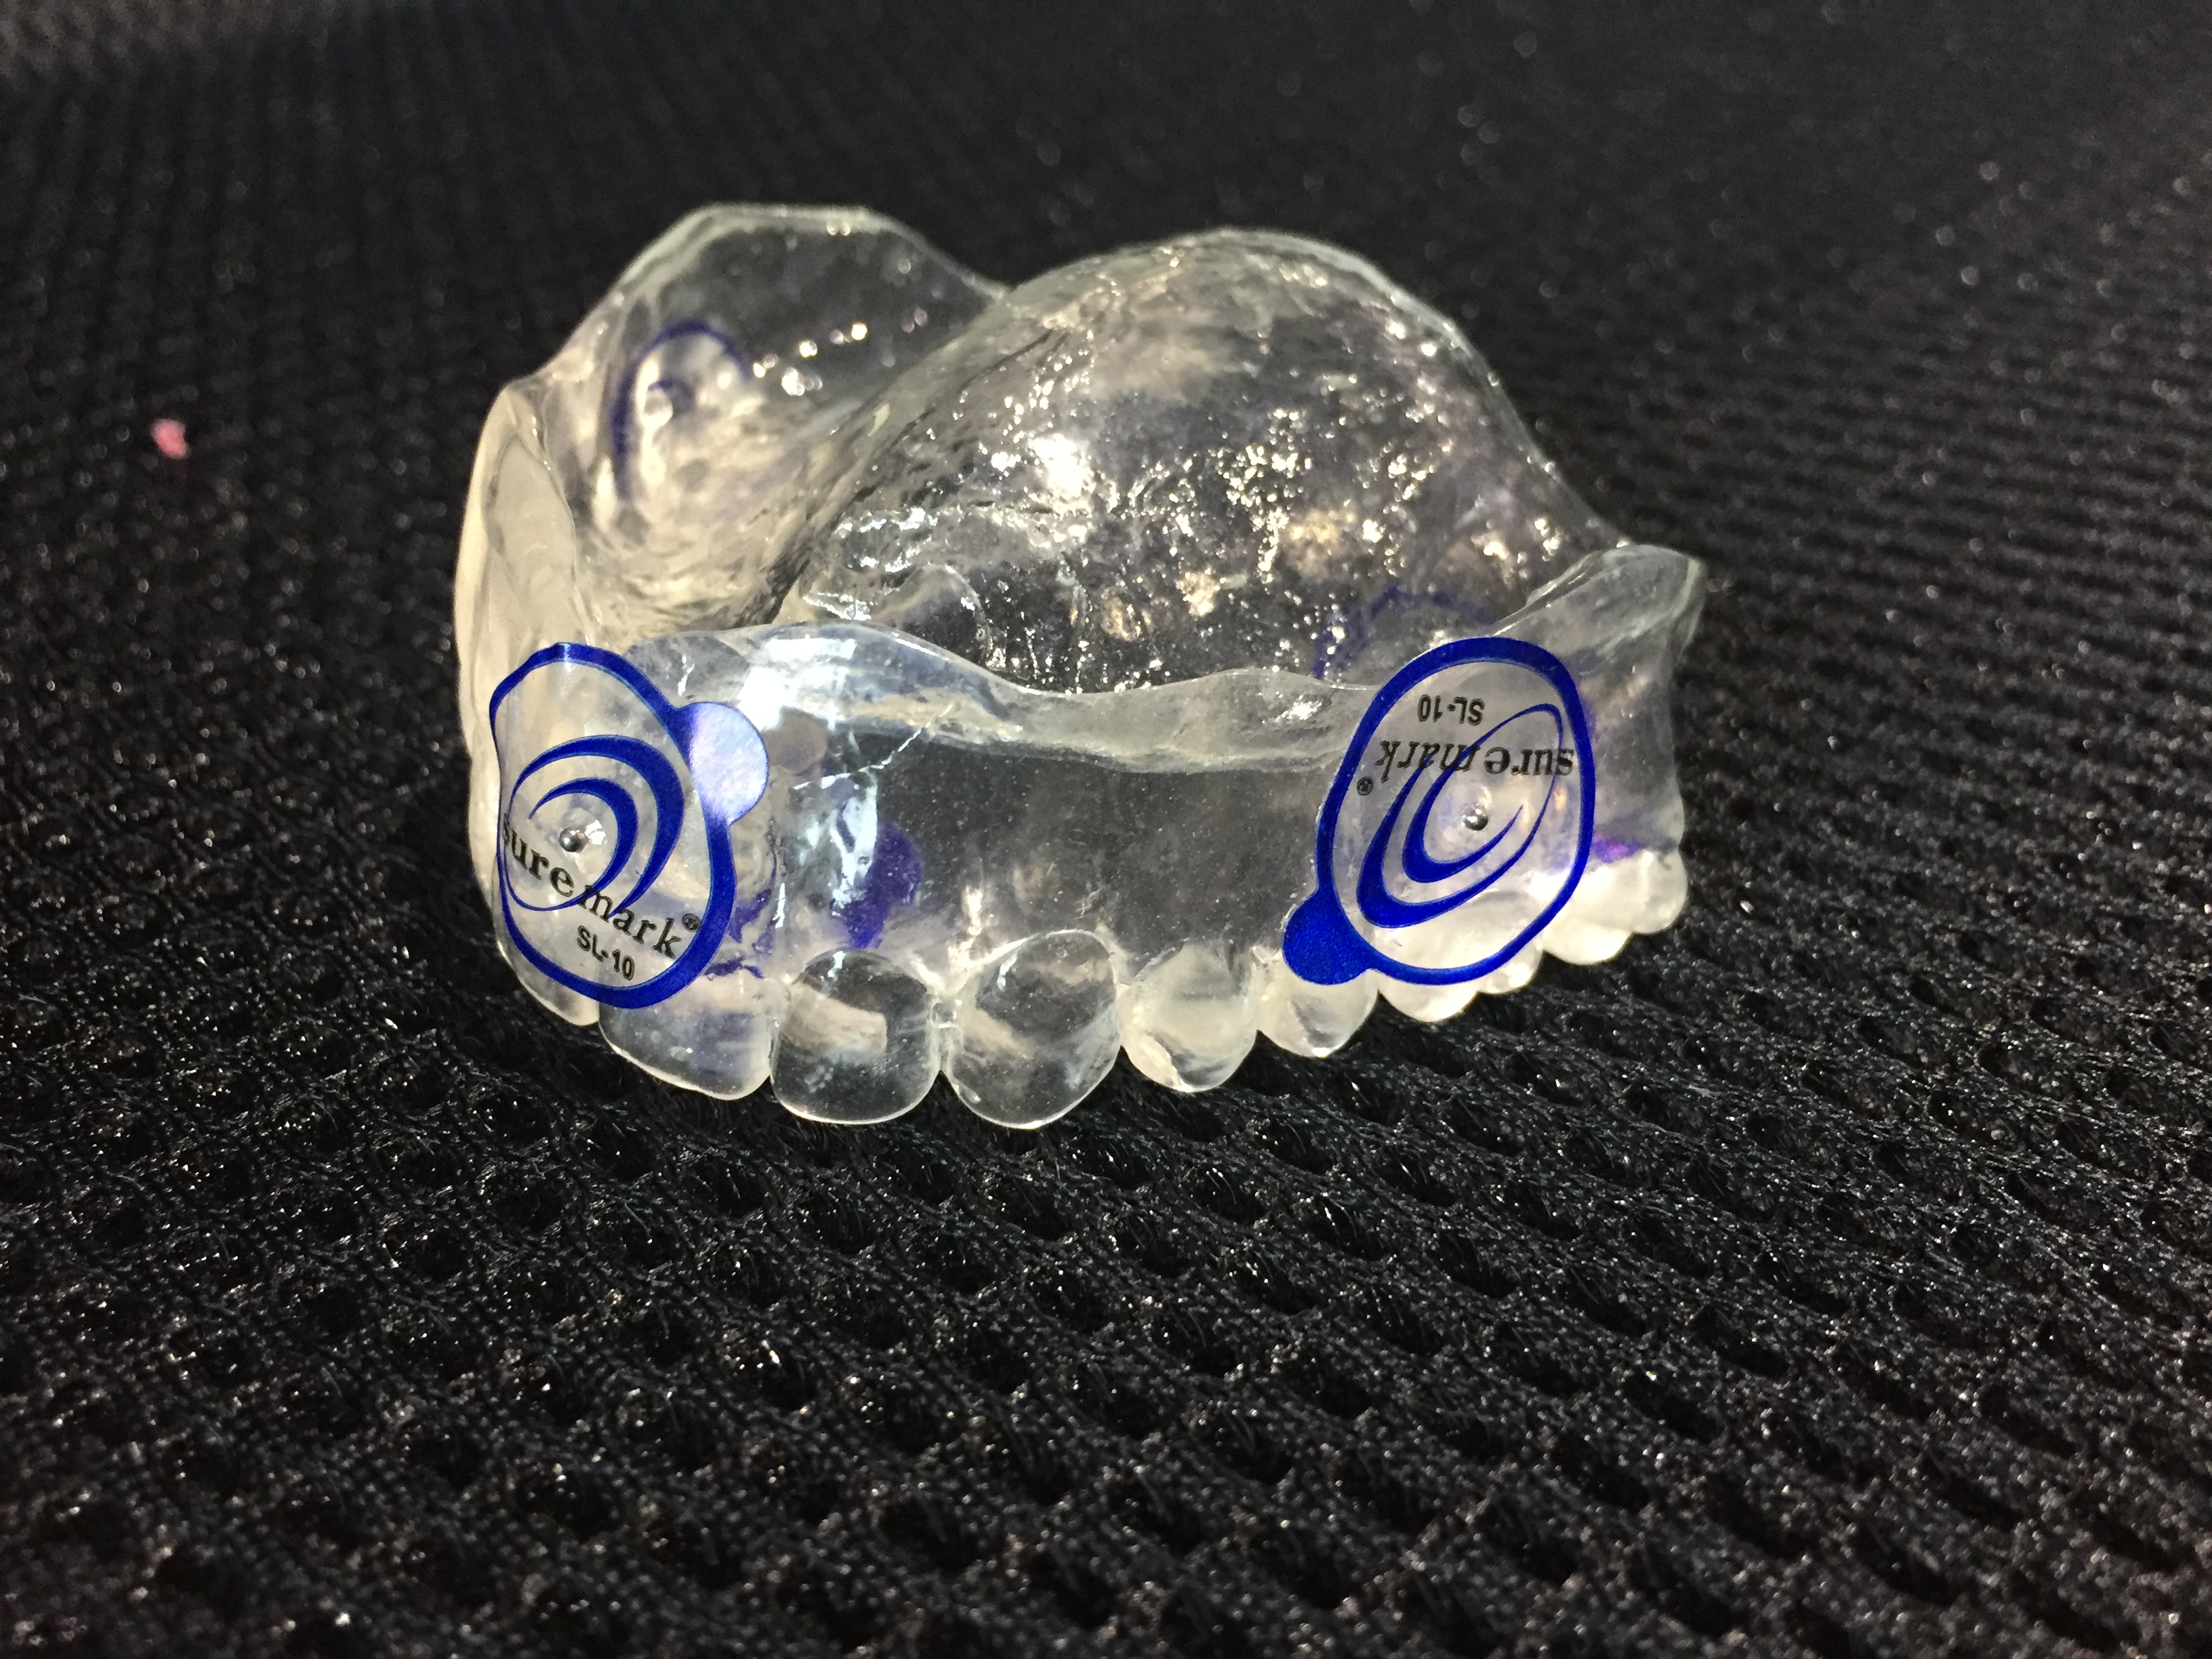
The “Alternative Dual Scan Protocol” is recommended if you are using the Sirona CBCT unit for fully edentulous cases, or the patient’s denture has metal sub-structures. Using this technique, a duplicate clear denture will be required.
Scenario #1: PREFFERED
1. Duplicate the patients hard-relined, well-fitting denture into a clear acrylic denture (NO Barium or Biocryl X).
2. On the clear acrylic duplicate denture, place 6 x-ray markers:
– Place 3 markers on the facial/buccal surface and an additional 3 markers on the lingual surface
– Place the markers on varying axial planes
– Example: if you place a marker on the buccal area of #2-3, then place your next marker on the lingual area of #4-5 area, the next marker on the facial of #8-9 area and so on
*Do not place the markers on the intaglio surface of the denture*


3. Pre-Scan Patient Instructions:
– Use a bite registration for separation, secure fit, and to eliminate rocking
– Confirm fit by asking the patient “Is the denture fitting correctly?”
– Breathe through your nose, close your eyes, and place the tongue at the back of the mouth
4. Capture CBCT of the patient WEARING the denture with the x-ray markers.
Vital Anatomy to be captured:
– Superior: Mid Sinus / below orbit
– Inferior: Capture 1-3 mm of mandible dentition
CBCT General Settings: Maxl 6cm – 8cm, 0.3 – 0.4 Voxel
5. When scanning a patient following Dual Scan Protocol:
– Review the scan carefully to be sure there is no “Black Air Space” between the denture and the soft tissue of the patient
Rejected Scan ![]()
Accepted Scan ![]()
6. Export and Upload CBCT Scan
– Export the CBCT scan in a multi-file DICOM format to the desktop
– Right click on the folder, go to “Send To”, and select “Compressed (Zipped) Folder”
– Upload the zipped/compressed folder to Implant Concierge
7. Ship the duplicate denture with the x-ray markers STILL ATTACHED, to Implant Concierge.
More information on exporting the DICOM files form you specific CBCT machine can be found under the “Exporting DICOM” section.
For assistance in printing a shipping label, please visit “Print a Shipping Label” in the “How To” section.
Scenario #2: NOT Prefered
If the Doctor has already scanned the patient wearing a radio-opaque denture…
1. Ship the denture to Implant Concierge
2. Ship the Master Cast to Implant Concierge
Fully Edentulous CBCT Scan: Alternate Dual Scan Protocol of Mandible
Scenario #1: PREFERRED
1. Duplicate the patients hard-relined, well-fitting denture into a clear acrylic denture (NO Barium or Biocryl X). 2. On the clear acrylic duplicate denture, place 6 x-ray markers: – Place 3 markers on the facial/buccal surface and an additional 3 markers on the lingual surface – Place the markers on varying axial planes – Example: if you place a marker on the buccal area of #28-29, then place your next marker on the lingual area of #27-26 area, the next marker on the facial of #24-25 area and so on *Do not place the markers on the intaglio surface of the denture*

 3. Pre-Scan Patient Instructions:
– Use a bite registration for separation, secure fit, and to eliminate rocking
– Confirm fit by asking the patient “Is the denture fitting correctly?”
– Breathe through your nose, close your eyes, and place the tongue at the back of the mouth
4. Capture CBCT of the patient WEARING the denture with the x-ray markers.
Vital Anatomy to be captured:
– Superior: Capture 1-3mm of maxilla dentition
– Inferior: Capture mandible with slight clearance below chin
CBCT General Settings: Mand 6cm – 8cm, 0.3 – 0.4 Voxel
5. When scanning a patient following Dual Scan Protocol:
– Review the scan carefully to be sure there is no “Black Air Space” between the denture and the soft tissue of the patient.
Rejected Scan
Accepted Scan
6. Export and Upload.
3. Pre-Scan Patient Instructions:
– Use a bite registration for separation, secure fit, and to eliminate rocking
– Confirm fit by asking the patient “Is the denture fitting correctly?”
– Breathe through your nose, close your eyes, and place the tongue at the back of the mouth
4. Capture CBCT of the patient WEARING the denture with the x-ray markers.
Vital Anatomy to be captured:
– Superior: Capture 1-3mm of maxilla dentition
– Inferior: Capture mandible with slight clearance below chin
CBCT General Settings: Mand 6cm – 8cm, 0.3 – 0.4 Voxel
5. When scanning a patient following Dual Scan Protocol:
– Review the scan carefully to be sure there is no “Black Air Space” between the denture and the soft tissue of the patient.
Rejected Scan
Accepted Scan
6. Export and Upload.
Print a shipping label
Scenario #2: NOT Prefered
If the Doctor has already scanned the patient wearing a radio-opaque denture… 1. Ship the denture to Implant Concierge 2. Ship the Master Cast to Implant ConciergeFully Edentulous: Soft Tissue Separation
Printable PDF of Scanning Protocol: Soft Tissue Separation
The “Soft Tissue Separation” technique is only recommended if your patient has a denture made with barium sulfate or a metal substructure, or if your patient does not have a denture. If your patient does have an acrylic denture, please refer to and follow Dual Scan Protocol.
1. Take a full arch CBCT scan of the patient WITHOUT an appliance:
– Place cotton rolls along the entire arch, in between the cheek and vestibule of the patient
– For maxillary scans, have the patient rest their tongue down and back
– For mandibular scans, place cotton rolls under the tongue
– Have the patient bite on additional cotton rolls bi-laterally
2. Review the scan to ensure that you can clearly see the edentulous ridge:
Accepted Scan ![]()

Rejected Scan ![]()

* Please note images may vary on CBCT machines *
3. Export and Upload
– Export the CBCT scan in a multi-file DICOM format to the desktop
– Right click on the folder, go to “Send To”, and select “Compressed (Zipped) Folder”
– Upload the zipped/compressed folder to Implant Concierge
4. Take a soft tissue impression of the patient and ship the diagnostic cast to Implant Concierge
More information on exporting the DICOM files from your specific CBCT machine can be found under the “Exporting DICOM” section.
For assistance in printing a shipping label, please visit “Print a Shipping Label” in the “How To” section.
Placement of the SureMark markers
Printable PDF: Where To Place the SureMark Markers
- Ensure the denture surface is dry before placing the sticker markers.
- Use a well-fitting, hard lined denture with NO soft liner; your surgical guide will only fit as well as the denture does without soft liner!
- Place at least 6 markers (no need to exceed 8 markers) on varying planes split between the buccal and palatal/lingual, making sure they do not overlap with one another. For example: if you place a marker on the buccal area of #2 the place your next marker on the palatal side of #4/5 area, then place the next marker on the facial of #8-9 area and so on. Do not place the markers on the intaglio surface of the denture.
- Place the metal BB just above the gingival margin of the denture teeth. Do not place markers on the palatal area.
- Remember you will be doing two scans: One scan of the marked denture by itself on a non-radiopaque surface like packing foam, and another of the patient wearing the marked denture. Do not remove the markers in between scans.
For more information regarding Dual Scan Protocol, please visit our Scanning Protocol section.